The 1963 list of classes of Coaching Rollingstock Book shows a CLV as a Composite (First and Second Class), Lavatory Brake Van. The list shows a total of 154 vans with 24 variations.

The
length of the van’s bodies varied between 32 ft. and 50 ft. and they carry between
20 to 54 passengers. Most have two compartments, one first class and one second
class with each compartments having their own lavatory. Some longer vans have
two compartments for each class, some of these vans had a compartment signed
“Women and Children Only”, ARHS (Qld) Sunshine Express January 1975 showed CLV
1011 as having this signage.

Some
vans had reversible 1st and 2nd boards to change the
class subject to requirements. In the early 1970’s some compartments where were
marked as smoking compartments. During this period, 2nd class was
reclassified to Economy class which didn’t carry any markings / signage. As one
would expect with some many variations and QR being QR there would some unusual
unique vehicles. One such van being the end veranda Davison Vans with a centre
Guards compartment, even within this style there were five different variations
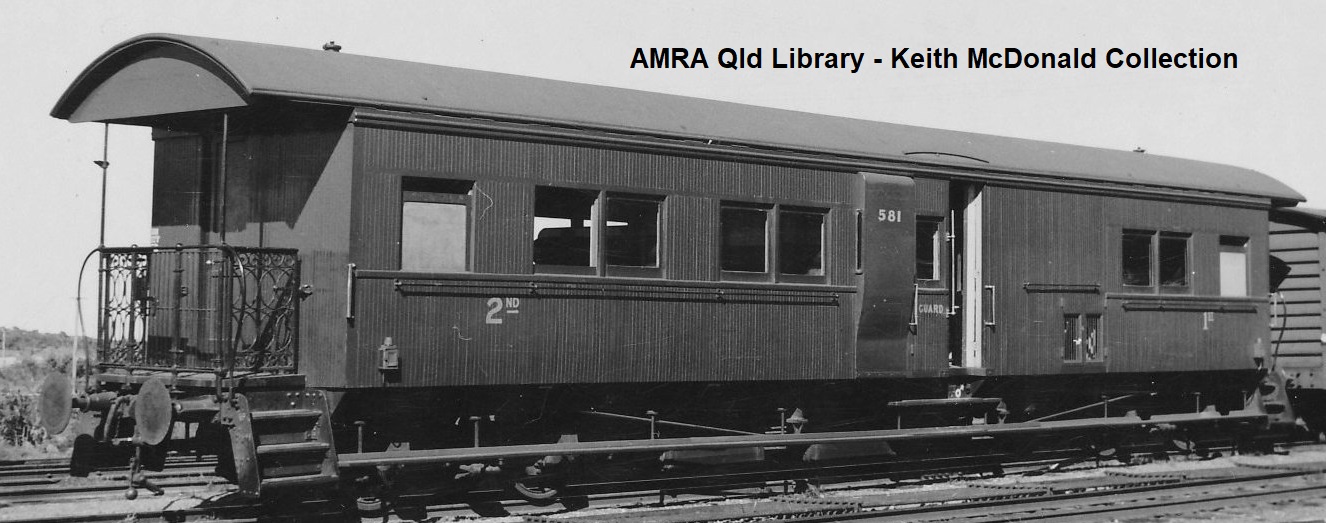
CLV 581 after rebuilt in 1935. Toilets moved to the ends and one dog box. Seven - 1st and 17 - 2nd class passengers.

The
first guards van I built was one of these back in the mid 1970’s before scribed
styrene, bogies and decals were available. Showing its age (hit the floor a
couple of times over the years) the van is still operational on the layout
today. Maybe it’s time the van went to the Westgate Museum and I should add a
replacement to the project list.

CLV vans could be observed on most trains around the state, the larger vans being used on mixed trains on main lines and the smaller vans on Branch lines where a service had passenger accommodation. Mixed trains were goods trains with passenger accommodation attached, most travelled at 35 mph/60 km/h due to the class of wagons on the train, F, H, C, ALG etc. By the mid 1960’s a couple were travelling at 50 mph/80 km/h, these trains conveyed red diamond and circle wagons only. 30D on the Mt Isa line was one such service. Some of these mixed trains had a sleeping car as well, given all carriages/vans were of wooden construction they were marshalled at the rear of the train. The good book (Rule Book) stated that wooden vehicles conveying passengers were not to be marshalled between steel vehicles. Many modellers think a mixed train is a train conveying a mix of wagons, various classes or freight types, that’s not correct. Mixed trains run under the same operational rules as a passenger train.
Going
back to August 2019 blog I spoke about 6 Up and 19 Down were CLV van was used
on the Toowoomba to Roma Passenger service and the CLV continued to Charleville
as mixed train with a sleeping car. May 2021 blog there was a CLV on the
Brisbane to Maryborough passenger service that went to Kingaroy. November 1969
Working Time Table shows the marshalling for Train 54 A from Rockhampton,
CLV
Van
Springsure Road & Milk Wagon (CR)
Springsure Van,
Blair
Athol Van
Blair
Athol Road Wagon.
Blair
Athol Cars (KCS)
Blair
Athol Loading
Western
Road Wagon
Western
Loading in Station Order
Springsure
Loading
Emerald
Loading.
The November 1983 Working Time Tables shows the following marshalling for 54 A Express Freight Train on Sundays from Rockhampton.
CLV
Van Springsure
CLV
Van Blair Athol
Blair
Athol Road.
BL
(Second Sitter). Blair Athol
CLV
Longreach
Express
freight Loading.
By the mid 1970’s, passenger traffic was dropping off and many of the CLV were modified and reclassed BLV. The guard’s compartment was extended into the adjacent passenger compartment, often giving the guard a toilet. Also, around this time gas cooking rings and heaters were being provided for the guards. The additional area became handy for this equipment and gas bottles.
Of late I have been adding/making a number of Guard Vans for the layout. Most of the CLV’s were longer vans between 40 ft. and 50 ft. I like the look of shorter vans on the layout. To me on the layout, a 50 ft. guards van on the back of a train conveying a string of four wheeled wagons looks out of place. I know in the real world it happen regularly. I feel a smaller 30 ft. van fits the deal better, given on the layout we have limited room. So, for this project I have picked a later 32 ft. wooden van.
In 1950/51 twenty (20) CLV vans # 1392 – 1411 entered service. They were built to a newer profile with a wider and higher body with a rounder roof. The average tare weight was around 15 ton 17 cwt and they carried 9 first class and 17 second class passengers. The guard’s compartment was basic with the side look outs on both sides and dog box, just over 10 ft. for the guards and roadside for the trip. The van rode on angle iron bogies at 21 ft. centres fitted with 2 ft. 2 in wheels that were 4 ft. 6 in apart. The gross allowed load was just 20 tons. Standard draw hooks and electric light was fitted.

Van
1392 was destroyed in 1957 and van 1411 destroyed in 1959, the plan show vans
1403, 1394, 1408 were also written off, date not known. Van 1398 was converted
to a BLV, the first class section was boarded up and became part of the guard’s
compartment giving the guard the first class loo. Gas bottles were fitted to
one side providing a gas cooking ring and heater for the guard. During this modification,
the angle iron bogies on some vans were replaced with ride control type, QR 4/5
type fitted with roller bearings, or other similar bogies.

 |
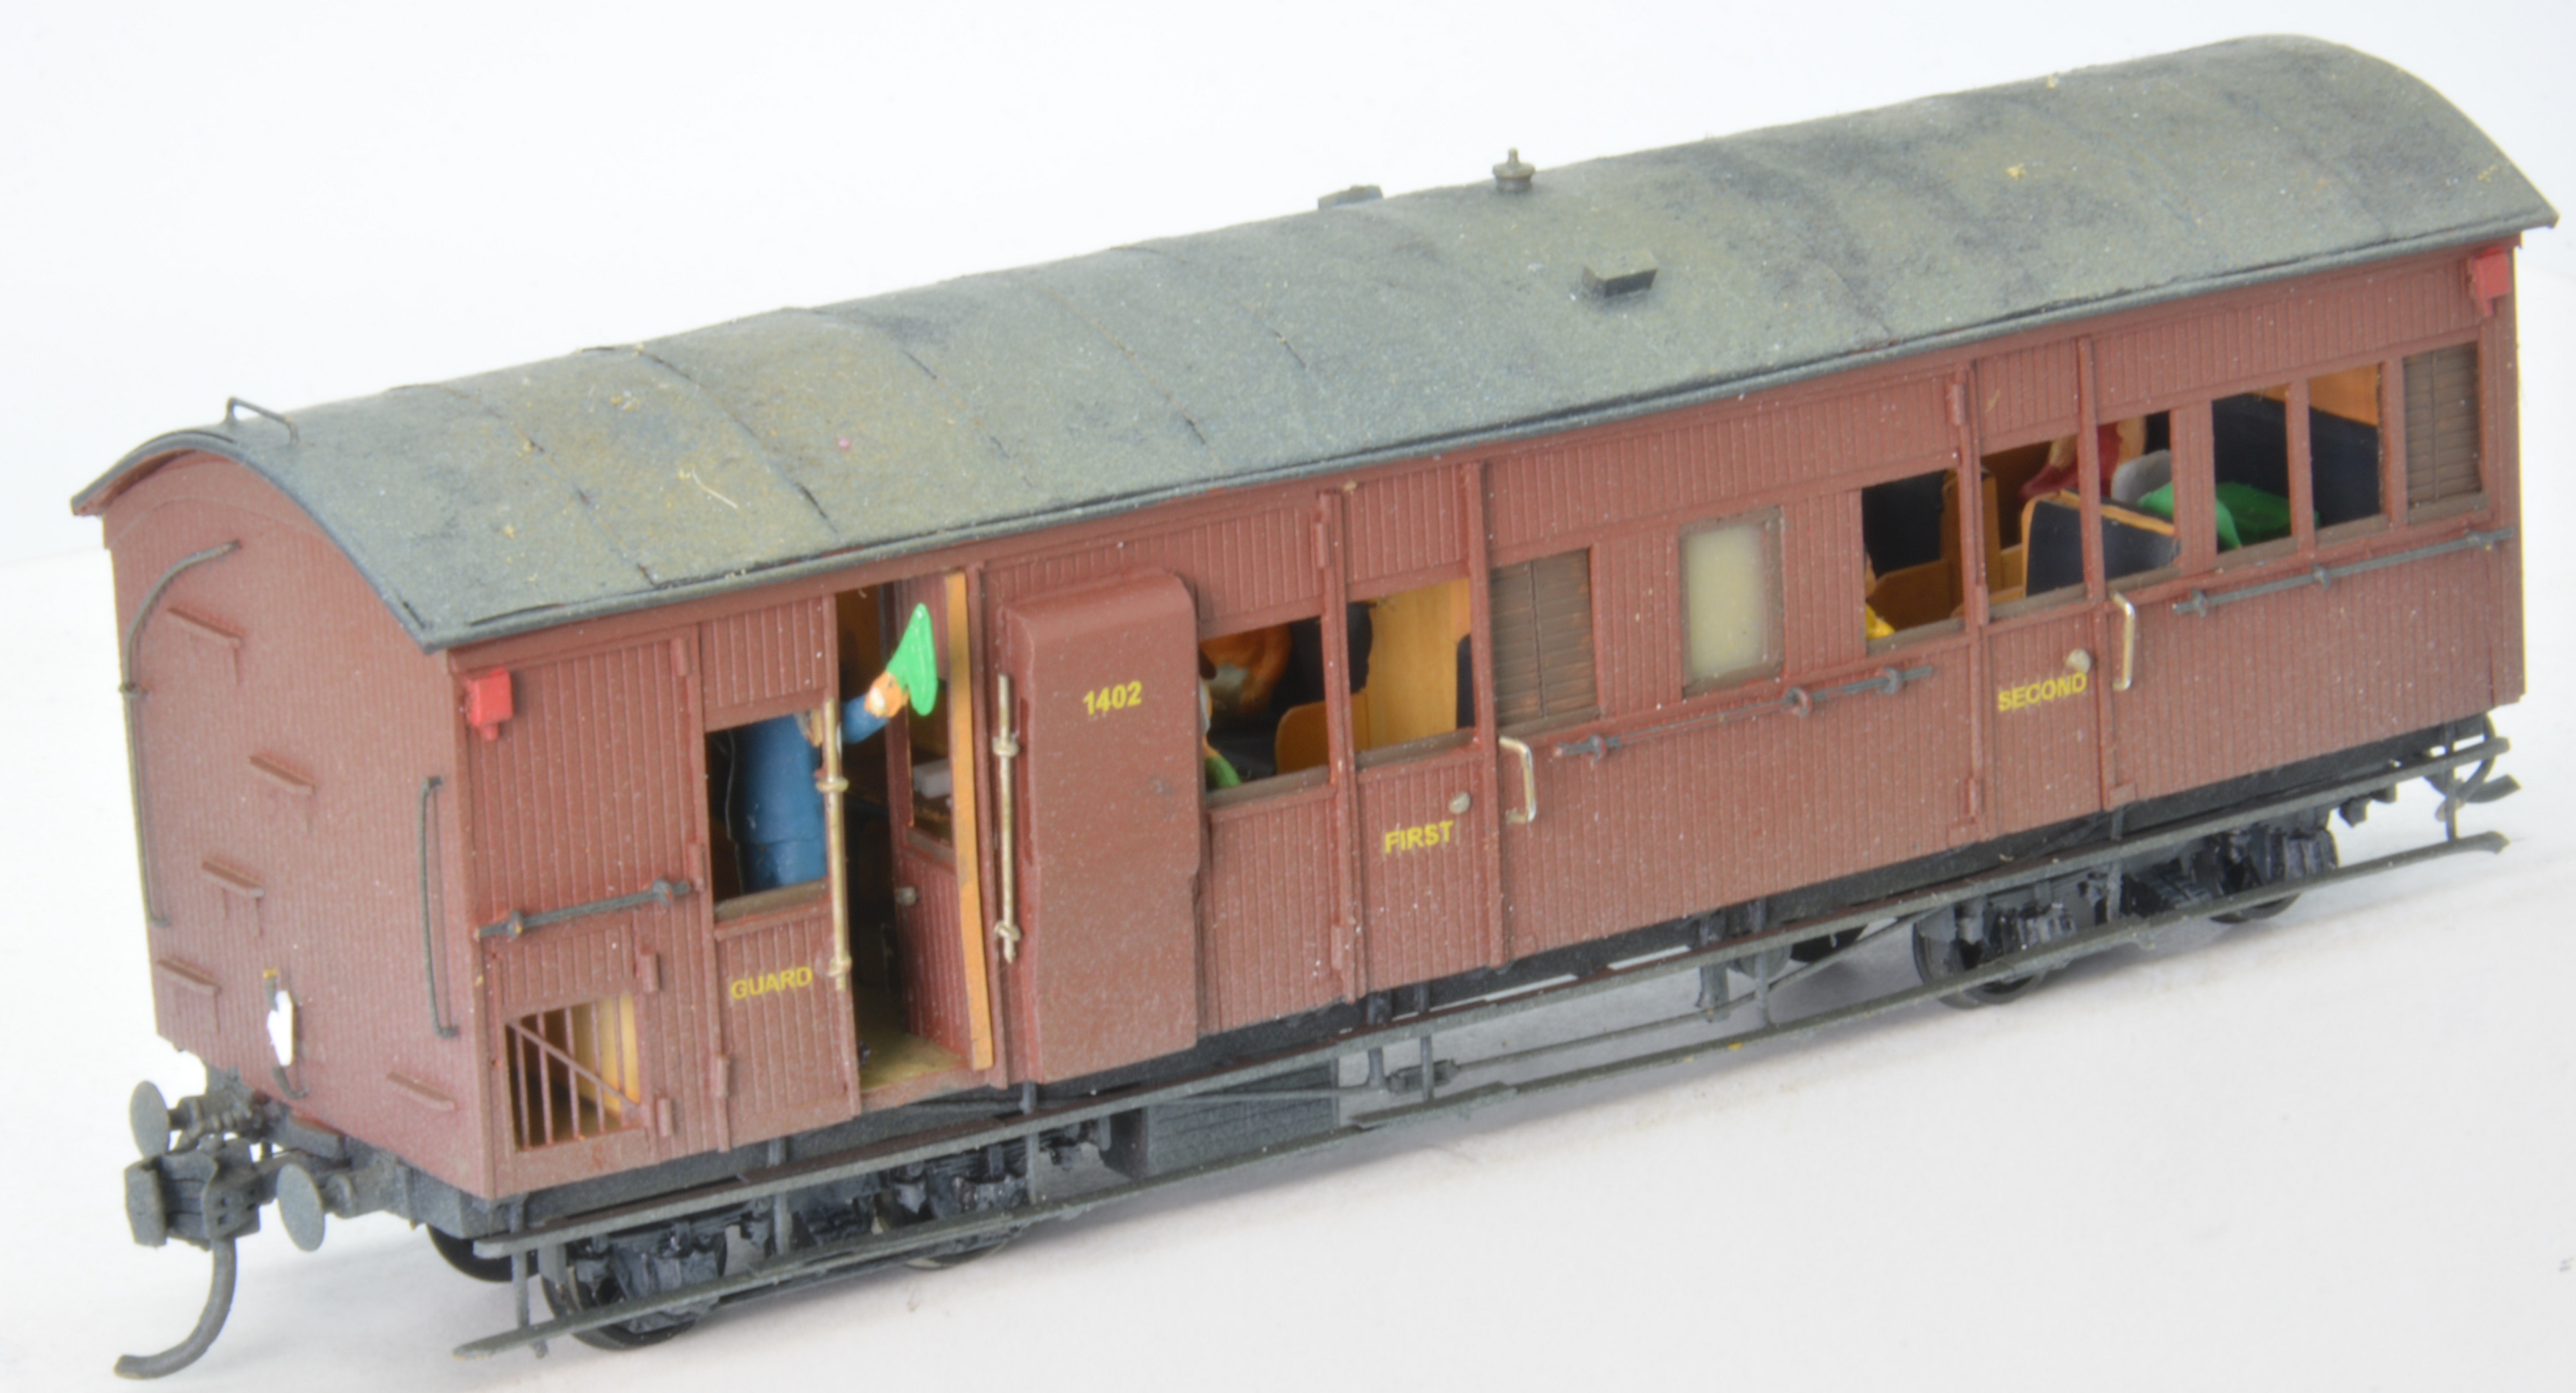
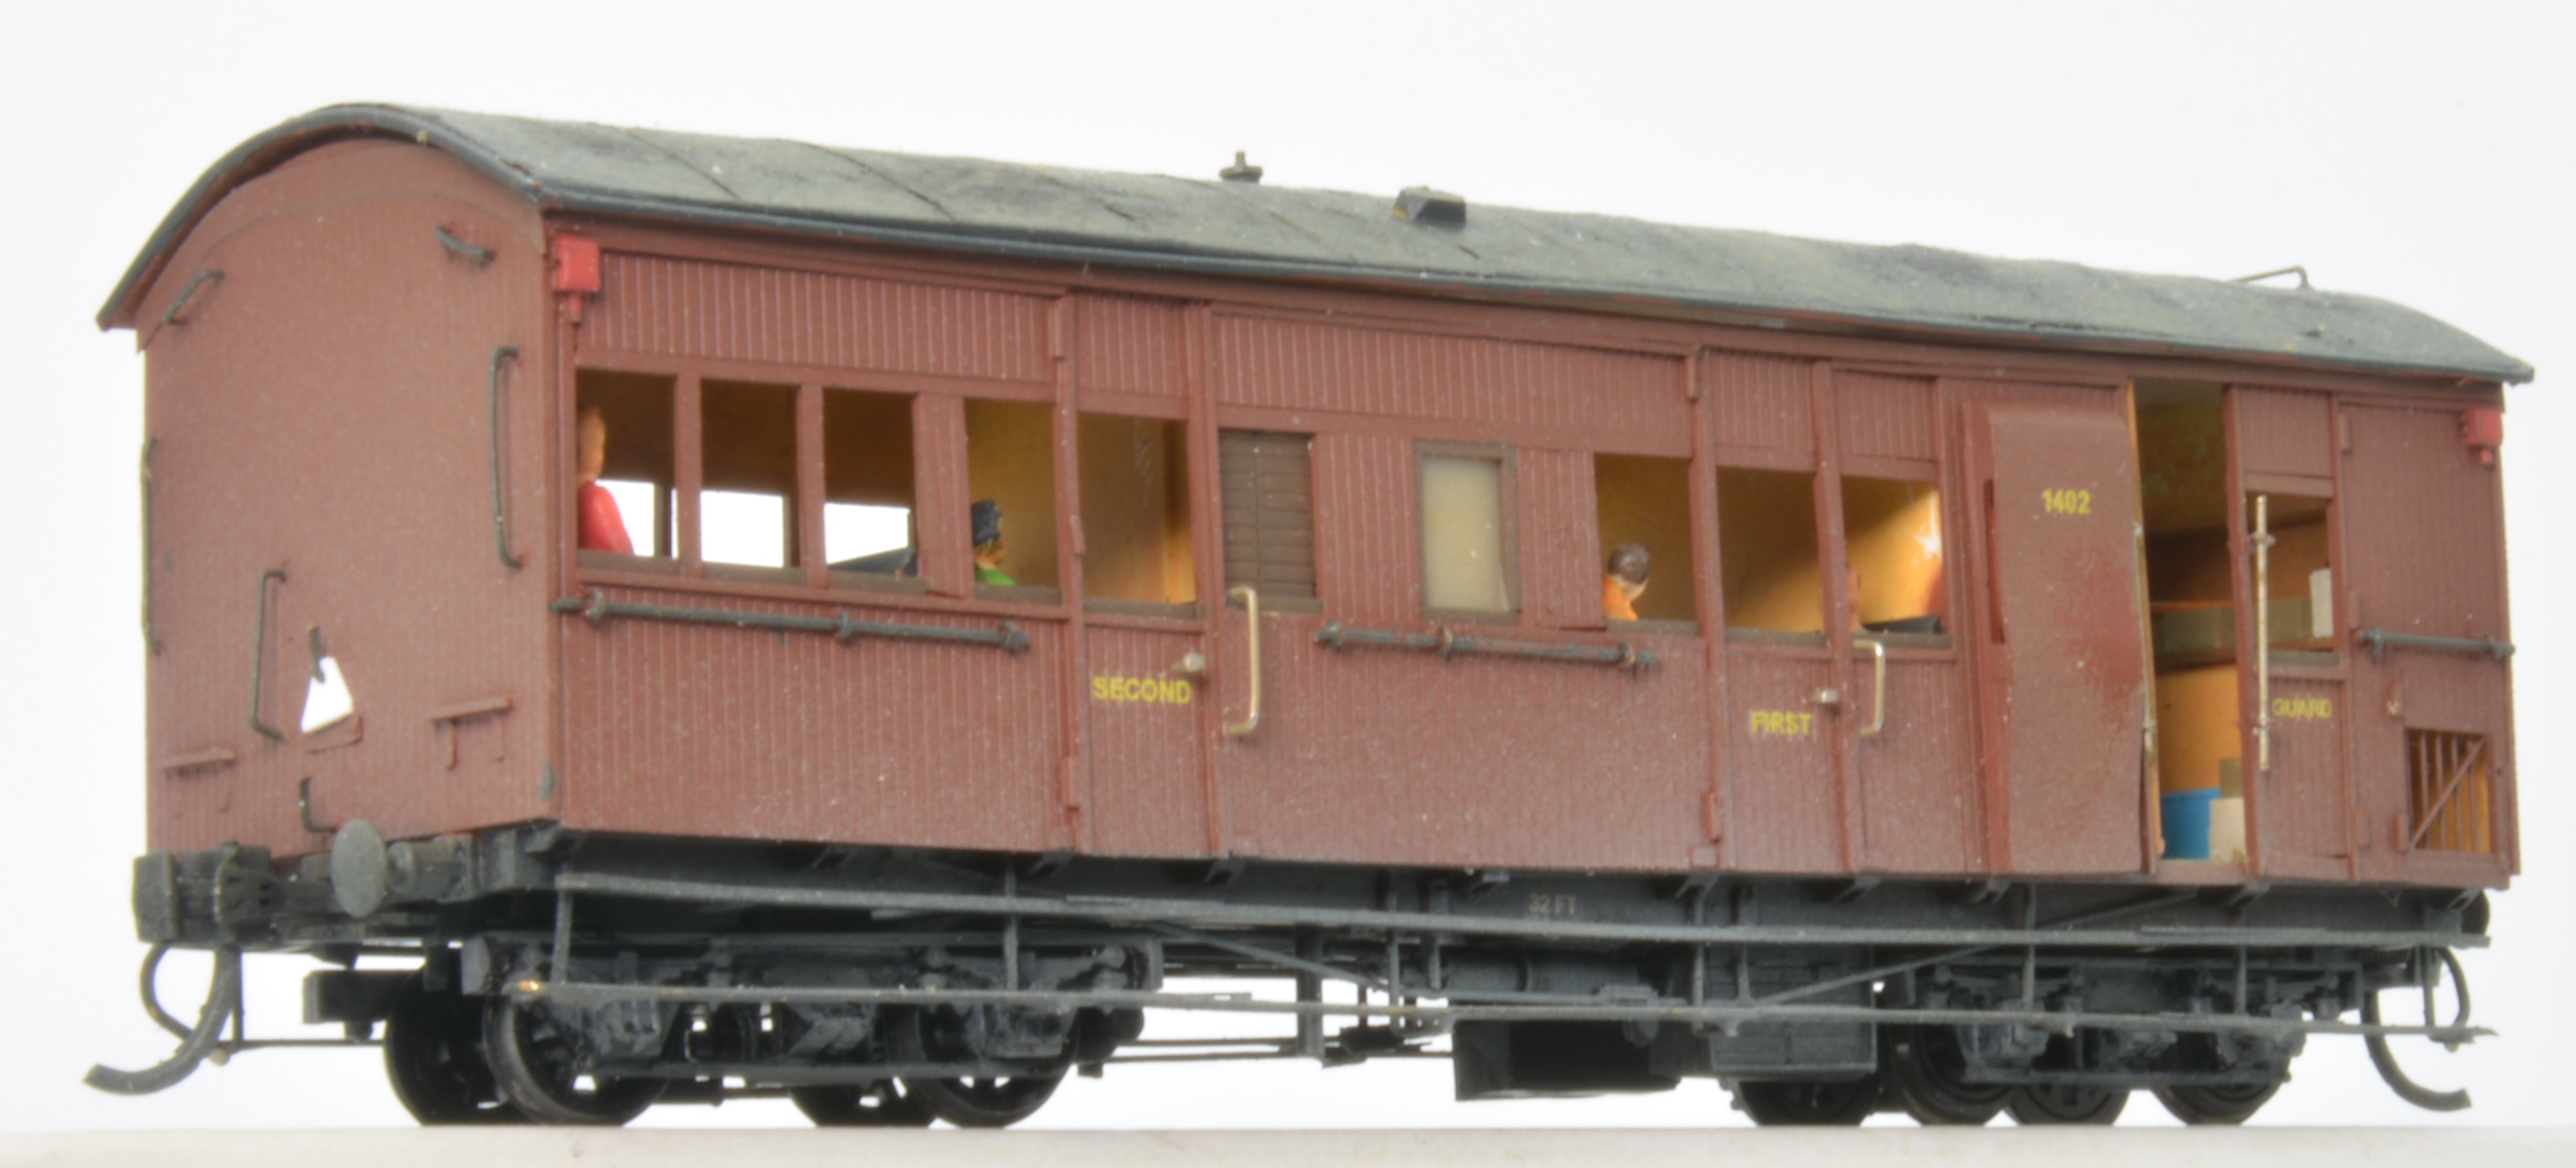
BLV 1402 still has Bar Frame bogies, no dog box and one window enclosed in the economy compartment. .
.jpg)
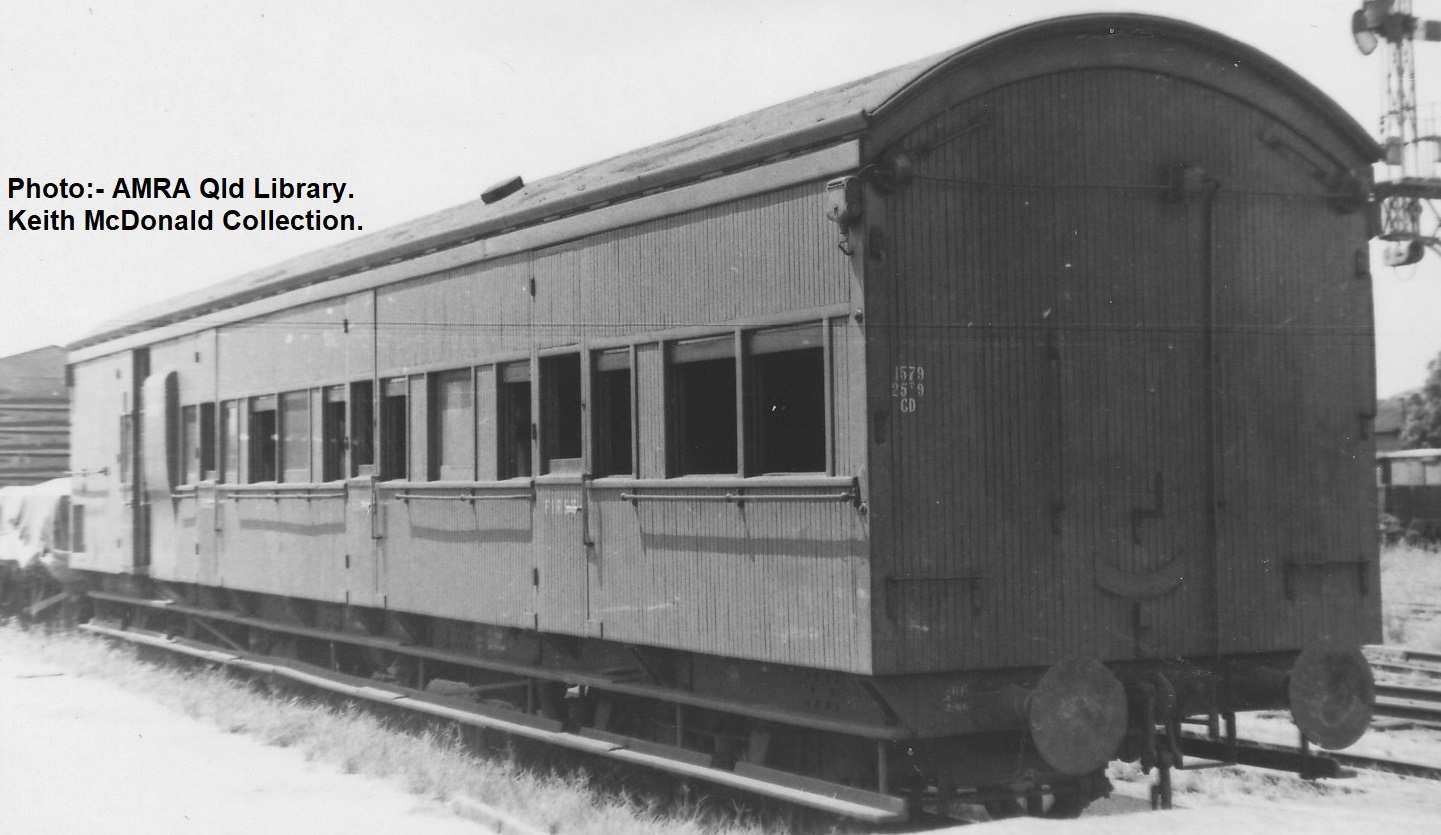
BLV 1400 Pioneer Steam.
Carriage Plan P341 shows the following vans were converted to BLV’s. 1980/01 # 1398, 1393, 1395, 1397, 1399, 1400, 1404, 1405, 1406, 1410. In 1983 van 1396 was also converted. Van 1400 is at Pioneer Steam at Box Flat, and van 1401 is part of the AHRS collect at Rosewood (Kunkala).
I understand the vans were known as Moriarty vans, the commissioner that came to office shortly after vans entered service, the term was not used all that often like some other vans and carriages.
Model:- The
van was made using scribed, sheet and strip styrene. Again, the windows were
made in the down position except the toilet window. The Guards doors were made
and fixed in the open position. After painting, some windows had shutters
/blinds fitted. Caintode Flats bogies, CFB
8S Passenger 4’ 6” w/b fitted with 2’ 2” wheel were used. Drawgear used was
Kadee # 158 whisker couplings. Seats, toilet fitting and goods items were
fabricated from styrene sheet/strip.


Roadside work has been completed and right away has been
given for 19 down mixed to leave Westgate.

I have been air brushing my models for many years, I feel it gives a much better finish than what I can achieve by hand painting. Over these years I have used various types of air brushers and compressors. There is quite a cost with setting it all up. Most of my painting was done outside in the fresh air with a breeze blowing to help blow the paint toxin’s away from me. For many years I used Floquil paints until they were no longer available. Shock, horror, just as you master something, it no longer available. Setting it up was another story, many trips between the workshop and the BBQ area. Often painting was put off until the setting up was worth it. Often a number of projects would be on hold waiting for a nice find day to be outside.
Towards the end of last year at a NMRA meeting, a member showed a couple of hoseless/cordless mini air brush units he was playing around with that he purchased on EBay. A mate from Wednesday Workshop had also made a comment on them and was wondering how they would go. A few weeks back I watched a YouTube video on painting figures by a modeller in Melbourne. He used one of these air brushers to add a primer to the figures he was about paint. (https://www.willjamesrailways.com/)
Checking out the “Neat and Handy” (www.neatandhandy.com) website I found they had a warehouse in Melbourne, they stocked various goodies for the modeller/hobbyist including spares parts and accessories. After some consideration I desired on purchasing a basic unit for $ 77.00 delivered. The unit arrived within four days and was put to the test. At the time Brisbane weather was more like UK weather, cloudy and raining most days without any sunshine. The forecast for next week was more of the same without any fine clear days. The pack contained a double action airbrush fitted with a .3 mm needle, three paint cups, spanner, recharging cord, adaptor, and a pipette. The unit recharges in approximately 60 minutes and runs for about 20/30 minutes on a charge, the unit delivers air at approximately 20 psi. Information on the website suggests some popular brands of airbrushes can also be fitted to the compressor/battery unit. My Nozomi (Runway 13) airbrush has the same thread (⅛” BSP) and it fits straight on without any issues, but my Badger airbrush will not fit. After purchasing the Runway 13 airbrush a number of years ago to overcome the two different thread types with one hose from the compressor I fitted “quick-release” adaptors that where purchased from Runway 13.
The CLV van was the test model for the new airbrush. A mix of paint types was used and a full list of paint used is below. I also painted two other Guard Vans at the same time using the same paints. Painting the various colours and allowing additional drying time I found the run time was more than adequate and at no time did I run out of air. At times there was a day or two between each coat of paint. The spray was very fine and the small cup is all that was required. Holding onto the base and pulling back on the trigger can be tiring if done for extended time. The airbrush has a needle stop allowing you to adjust the needle travel, great for weathering. This is a feature I don’t have on my $ 200.00 airbrush I have been using for years. Thinning of the paint was done in small plastic type cups to consistency of milk, pull the stirrer from the paint and most paint will leave the stirrer. The inner working of the brush is very similar to other airbrushes I have. A deep clean (pulling the airbrush apart and cleaning all parts internally) after completing jobs for the day was similar to the other airbrushes and only took a few minutes.
Being a good solider with two left feet sometimes things do go a bit turkey from time to time. Cleaning the airbrush at the end of a job I knocked over the unit and it went base over apex onto the table without the needle protector in place. Yes, you got it, the needle point was bent and the air around the table turned blue. I have dropped one or two airbrushes over time and bent a few needles, but, this was the granddaddy of them all with the needle point at 90 degrees. With pliers the needle was straighten to a point where it could be removed from the airbrush. Rolling the needle point between two hard surface straighten it into a point again. The following day the airbrush was used and all was OK, the spray may of have had a bit wider than previously. I guess the lesson learnt is to remove the needle before removing the needle protector on the front of the airbrush or unscrew the airbrush from the unit before cleaning.
A replacement needle and nozzle ($11.00) was ordered, given an order was being placed I decided to order spare “O” rings ($14.00) and a quick release /air pressure regulator adaptor unit ($23.00). Shipping was $11.00. After ten days the package was shown as delivered but could not be found at my address, after a couple of emails a second package arrived four weeks after the original order. The quick release adaptor was not comparable with my Runway 13 units on other airbrushes I have. I does make it easier to remove the airbrush from the compressor and doing so there is less chance of bending another needle.
After a couple of days of use with various small jobs without recharging I ran the airbrush until there was no air. At the time the cup containing Model Color water based acrylic paint. The small amount of unused paint was tipped out of the cup. A deep clean was carried out using paper towel, a small stiff artist brush, cotton buds and a pipe cleaner. In packing up I left a small amount of cleaning fluid in the airbrush. The following day some weathering was completed without any issues. The manufacture suggests you do not run the airbrush when hooked to mains power.
Paining has become much easier with the cordless airbrush, setting up is much quicker, most of the equipment needed with a standard airbrush is not required. I now take one tray with everything I need. A big plus is you don’t have a compressor drumming away in your ears or frightening the daylights out of you when the thing starts up in the middle of a paint job. The unit successful applied all the paints I use in today modelling projects. Awesome for small jobs and a very welcome item to the workshop tool box. If you were staring out or your modelling area is limited, these units give you the opportunity to airbrush your models on a small budget.

Colours Used.
Interior Walls:- Vallejo
Model Color (Acrylic/water based) - # 70.860 Medium Flesh Tone. Air Brushed
thinned 50% paint, with 50% with thinners (Thinners was made up using 70% Flow
Improver, 30% Thinners, with a couple of drops of retarder. All Vallejo
products)
Floor
Guard’s Compartment::- Vallejo Model Color # 70.988 Khaki (Hand brushed)
Floor
Passenger Compartments:- Vallejo Model Color # 70.941 Burnt Umber (Hand
brushed)
Seats:-
Vallejo Model Color # 70.862 Black Grey (Hand brushed)
Window
frames and Shutter:- Vallejo Model Color # 70.941 Burnt Umber (Hand brushed).
Roof:-
Vallejo Model Color # 70.862 Black Grey (Hand brushed)
Vallejo
Model Color paints are water based acrylic paints.
Exterior Walls:- PGC
QR Passenger Red. (Air Brushed – Acrylic Lacquer thinned, 50% paint, with 50%
with lacquer thinners). Paint was thinned to the consistency of milk, paint runs
off the stirrer when pulled from the paint)
Underframe:-
SMS Chassis Black (Air Brushed – Air brush ready, pour straight from the bottle
into the air brush).
Side
Lights:- Vallejo Model Color # 70.957 Flat Red (Hand brushed)
Hand
rails were hand painted.
After
decals were added and allowed to dry, the model was sealed with Testors
Dullcote (Air
Brushed – Dullcote thinned with 50% with lacquer thinners).
Passenger
and Guard were hand painted using Vallejo Model Color paints.
Weathering:- The
following colours were used and applied with the air brush. All these paints
are water based acrylic paints designed for airbrushing, a small amount thinners
was used, same as above used with Model
Color.
Vallejo
Model Air # 71.139 US Field Drab.
Vallejo
Model Air # 71.133 Dirt.
Vallejo
Game Air # 72.762 Earth.
AK
Interactive AK 723 Dust.
Bogies The
Caintode Flats white metal bogies were air brushed with Mirotone Etch black and
then the bogie side frames were hand painted with Mirotone etch grey.
Other similar CLV Vans.
There
were similar style vans that were longer (40 ft. and 50ft) that were build much
earlier from around 1914 onwards. Earlier vans had crown lights above the doors
and windows, later van this was replaced with match wood.

CLV 1163 Corinda.
Caintode
Flats Models produce two kits of a 40 ft. version CLV van. 1914/25 Southport
(Relief) Van and later (1077) CLV van used in general traffic. These two are of
the general traffic type.


The last batch of CLV to be built was between 1953/55 numbers 1562 – 1581, they were the 50 ft. type.
Four 50 ft. vans can be found in museums at Ipswich Workshops, Rosewood (ARHS), Gin Gin and Winton. May be one day, I might add one of these to the layout???
To cover all CLV vans on the QR network would take quite a bit, some variations there was just one or two of that type.
Trust you found the information helpful and of assistance.
There is more vans in the workshop for the next post.
Regards,
Arthur H.
Another inspiring article Arthur. Great modelling. And I thought your spray painting report excellent, and on that basis, I too have just ordered one of the airbrushes from NeatandHandy.
ReplyDeleteThanks Rob,
ReplyDeleteYour comments are greatly appreciated. The more I use it the better I like it. It’s become a very usefully tool. A number of modellers around there have purchased one also. I gave a presentation at the Div. 1 NMRA meeting yesterday on the “Pros & Cons of a mini airbrush”, it generated quite a bit of discussion and a number requested the details.
Regards,
Arthur.