Tuesday 30 January 2018

MG Sheep Van.


Drawing 2649, (P159 dated 5/1/14) shows MG sheep vans/wagons were 20’ long by 8’ wide. They were the lowest of all the sheep wagon on the network coming in at 9’ 7⅝” high. This is much lower than most wooden box wagons, some AG covered goods wagons were 10’ 5½” high. The wagon had an average tare of 7 T 10 cwt and carried approximately 110 sheep. The wagon were similar to most other sheep wagons, covered two decks, side and end gates. The two decks are less than three feet apart. Drop down gangs on the end allowed for strings of wagons to be loaded from a single end or side loading ramp without the need of a engine to move the wagons as loaded.

 Old style ramp, most were modified in the mid 80's for the new steel wagons.
 
The wagon was fitted with Grover’s Bogies with 2’ 2” wheels, with 8” x 4” journals. Many QR wagons around the 20’ in length had Grover’s Bogies. In short they had a single axle swivel bogie at each end which was diagonal connected with rods. This allows the two wheelsets to turn into curves together reduce rail and wheel wear.   

Chivers "AG" kit with working Grover's bogies.
Statement showing rollingstock in service for the 30th of June 1960 showed 127 wagons in service.  The class remained in service until the mid 80’s. The wagons were painted Red Oxide until mid-1969, after that date they were painted QR Freight Grey. During the early to mid-70’s, wagons of both colours could be observed working on the network.    
The wagons were mainly used for single orders to convey sheep, pigs and calves to sales and small goods processing plants/abattoirs. It was common to see three or four 4 wheeled sheep wagons sitting in most stations yards on the Darling Downs. They were regular visitors to KR Darling Downs at Willowburn in Toowoomba and in Brisbane they would turn up at Cannon Hill and Doboy.
MG Charleville  
The General Appendix to the Book of Rules has a lot to say about the conveying of live stock.
Clause 477 indicates staff generally must exercise special care in the transport of live stock and do everything possible to avoid bruising. Care must be taken to avoid undue shunting. The overcrowding of calves or pigs in MG and L vans must be given attention. Large calves must not be forced into wagons in which they are unable to stand. Calves and pigs must not be loaded in the same tier of a livestock wagon unless they are effectively separated by a hurdle. When the hurdles are not provided by the consignor, the calves and pigs must be loaded in separate compartments and charged accordingly.
 
Trucks containing livestock must be tightly coupled together. Wagons containing livestock must as far as possible be marshalled towards the front of the train and not in the rear of empty and lightly loaded wagons. Wagon containing pigs attached to trains conveying passengers must be placed as far as possible from the passenger vehicles. Drivers were not over happy with pig wagons being on the engine, generally these were to be marshalled towards the centre of the train.    
Small consignments of livestock must not be accepted for places beyond the direct train service (I.e. stations west of Brisbane must not receive small consignment to station north thereof or vice Versa), without clearly intimating to the sender the delay which must take place. Consignment of livestock must also have the attention of the guard who must show on his Time and Occurrence Sheet any instance of livestock travelling badly together with cause, if this be know. All livestock wagons must be in a clean condition and all cattle wagons ashed before being loaded. Smoke-box ash, when available, must be used in preference to fire-box ash. 
A permit to travel, issued by an Inspector of stock, must be presented for each consignment of stock (except pigs), including stock in crate and consignments of a single sheep or goat conveyed in dog boxes, before such are accepted for conveyance by rail. The permit must be held by the person travelling in charge of the stock, but if there is no attendant it must be attached to the waybill, invoice or consignment note, and handed over to the consignee at destination.   
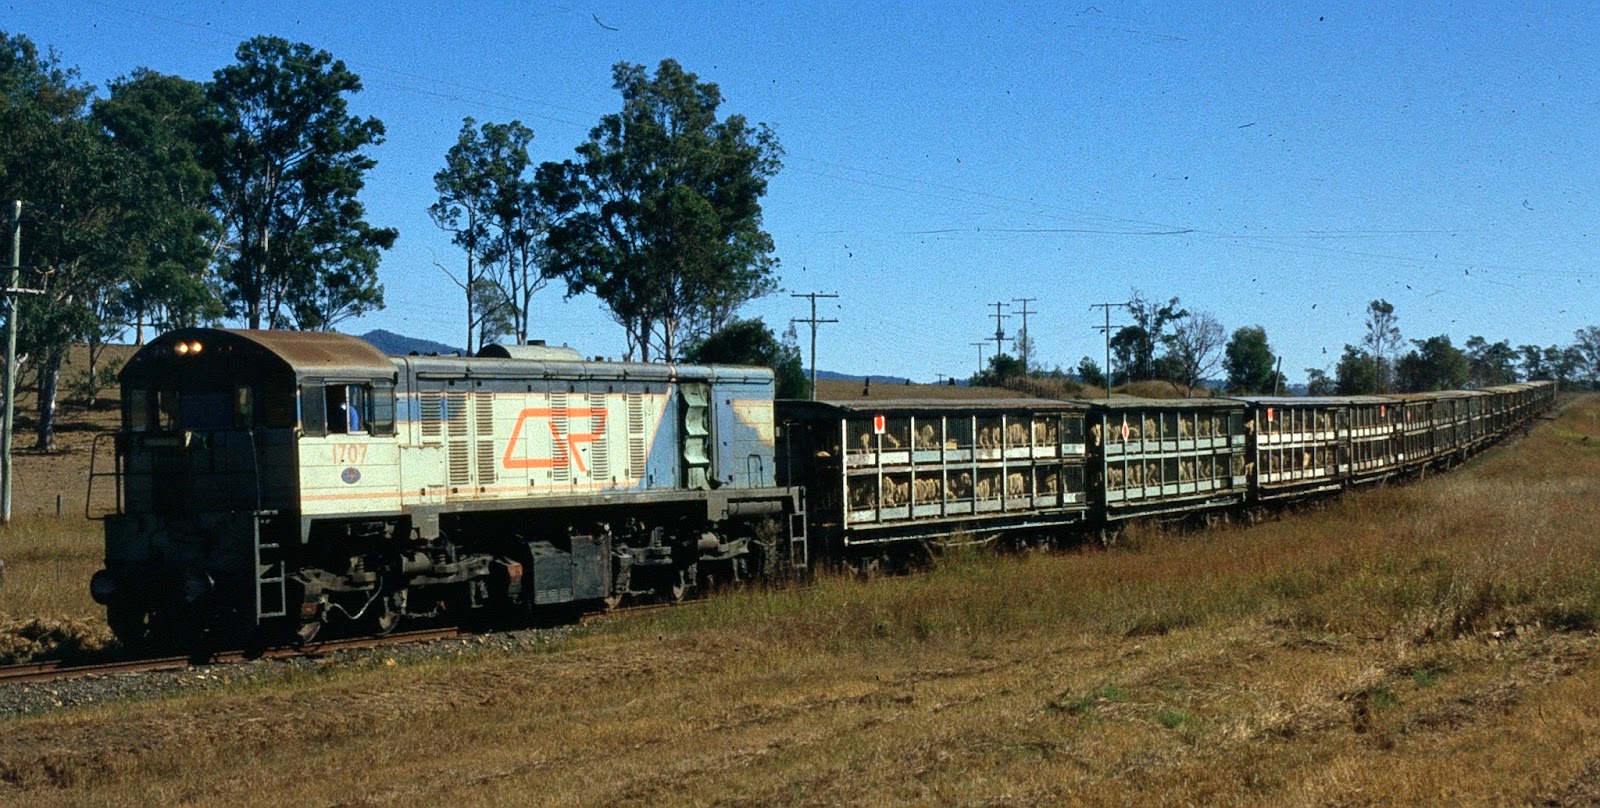
Sheep Train at Wood Hill
Sheep vans gates were sealed in a similar fashion to box wagon doors. Lad Porters were given the job of seal all eight doors on each sheep wagon. Unlike box wagons, the old seal could be left in place. This task often took place during the shunt move to place the wagons on the train, it was an awesome ride with one foot on the end of each wagon with the wagons bunching up and then running out. The main role of the seal was to keep the door pin in place. However, if the seal was missing on arrival at the destination, there was a good chance the door had been open in transit and gave cause to check the wagon contents. Each seal press stamped a number on the seal. The General Appendix showed the allocated number for each location, should one go missing the replacement press would be shown in the Weekly Notice.  Larger stations had more than one press, i.e. Toowoomba station # 409, Toowoomba Goods Shed # 165 and # 257, Toowoomba (Downs Co-op Dairy Coy) # 3. The Ambulance Officer had # 1 and # A0 for sealing First-Aid boxes. 
Press 9F (Location not shown in General Appendix. ??
 
Lad Porter "Westgate" sealing the wagon.
 
 
Scale of Rates for livestock. “MG” vans shall be charged at “L” van rates plus 50 per cent. Half an “L” of sheep or pigs shall be charged two-thirds the rate for a full “L” van, provided only one tier of the van is used. But the charge shall not be less than the minimum charge for a full “L” van for 32.19 kilometres. Rockhampton to Cannon Hill is 664.92 kilometres, In 1973 that cost $ 68.40 for a “L” van of sheep and $ 67.45 for pigs.  I will let you can do the sums for one tier (½) a “MG” wagon of sheep. You can see why I didn’t work to many livestock stations.
Having grown up as a kid in Western Queensland where most stations had sheep/cattle trucking yards, it was a given for Westgate to have one. Most western locations had separate sheep and cattle yards, with most sheep yards having an end loading banks. Due to the limited area available on the layout a combined yard (sheep/cattle) was selected. Most combined yards had side loading for both cattle and sheep. I really wanted an end loading bank for the sheep yard. In the late 60’s I recalled a new set of private yards being built at Sommariva, about 30 miles east of Charleville.

 Combined Loading Ramp at Goondiwindi
 
Side loading Ramp Ulimaroa (Miles - Roma).
End loading Ramp Sommariva  (Morven - Charleville)
These yards were unusual in that they were a combined sheep and cattle yards with a end sheep loading ramp. I also had a set of photos for the yards taken in the early 70’s. On deciding to build the yards for the layout I started looking for some measurements, so next time I visited home I would stop and get a few more photos and run a tape over various areas. You guessed it, it had been knocked over, even the siding was gone. A few mates were able to dip up some plans of both sheep and cattle yards. The next trick was making them fit into the area I had allocated for the yards. Both sheep and cattle loading ramp was much longer than I expected.  With a pencil, some graph paper and a scale ruler a revised ramps were drawn up that looked right, selective reduction is the name given to the process. The ramps were reduced by about a half, the size of the holding yards were also reduced to fit the allocated space.


Sommariva Yards.  
Now in having sheep and cattle yards, wagons are required to provide operations on my railway. Over the years various cattle wagons have been available, the current cattle wagons on the layout are some of the first produced going back to the 70’s. For time being they are OK for now. The plan is to replace them one day. Very little has been available for sheep wagons resulting in various thinking sessions looking over plans and photos searching for a simple method to make them. Sorry to report nothing has come up to dated. Maybe a brass etch for the bars could be the go ???.
Charleville Mid 80's.
MG Kit.    The kit was first made available by Three Foot Six Models for a limited period in the mid 1990’s.  About three years ago the kit was added to the Caintode Flats Model range. The kit contains brass etches, white metal lost wax and resin components. The main body etch is made from 2 layers to achieve the correct profile. To assemble the kit the manufacturer suggests good soldering skills are essential. I put off purchasing the kit and was waiting for someone to do their first. One was available at the May Show last year so I took the punt.  Over Christmas I plucked the courage to have a go.  
A good soldering iron is required, instructions suggest a temperature controlled iron of at least 50 watts with a 3 mm tip. A good supply of drills is required, the following sizes are needed .3mm, .35mm, .4mm, .5mm, 2mm and 2.5 mm. Getting small drills is not easy, so I asked Gary where to get them. He suggested McJing Tools at Yagoona in Sydney. mcjing.com.au They have the small drills in packs of 10 for $ 10.00. Postage was $ 10.00. A phone call with credit card details had the drills in my hands within 24 hours. All up you drill out about 200 .3mm holes in the etch parts. I did break a few drills, overall not as many I was expecting, just take it slow. The instructions for assembling and fitting the sliding gates suggest you take your patience tablets as his where the fun starts.  
The kit starts by assembling the underframe / lower floor. You have a choice of fixed or compensating bogies, I made mine compensating, one end is fixed and the other end rocks.
During construction, some small parts did join the frequent flyers club, thus some changes were made with substitute parts. The wagon was completed with all side gates working. I didn’t think to much about this during painting, you guest it, I paid the price and they don’t open anymore. With the end gates I made one end top gates open with the gang down for the loading ramp. At times they did run in service with open gates and walkway down. The gangs on the other end still work after painting. Just take your time and test fit parts before soldering. I did fit the underframe etch the wrong way around, closing off the brake cylinder mounting hole. That’s just me, if there a choice of two ways in doing things, I always manage to do it the wrong way.   
The only sheep I had was Kerroby Models, I purchased them unpainted in a bulk pack, painted ones are available. These are white metal, thus have little weigh to them. Sheep was only add to he outer sides to give a full load look. They were a little high and needed to be kneecapped a little. The Signals Branch Shapeways shop have 3D sheep which could be a better choice. All up the wagon comes in at 70 g, which is about NMRA standard for a H0 model of that size. To date the wagon has been marshalled on the lead of all trains and has run and pushed back without any issues. 
The completed wagon was first painted with a etch primer. Dulux Metalshield etch primer (grey) available from Bunnings was used. The paint from a rattle can was decanted into a plastic cup and applied to the model with an airbrush for more control. The finish colour was PGC Oxide lacquer. Underframe and buffer heads were picked out in black by hand.


Over all I'm very happy with the end result, but I let you be the judge.     
 

Thursday 4 January 2018

H / HJ Wagons


H / HJ wagons.

The eight wheeled open goods wagons on Queensland Railways were classified as “H” class wagon. Over the years, they were built in various lengths, 20ft, 26ft, 30ft and 32ft. If you were to summarise the standard “H” wagon in the 60’s, it would be the 30’ version.

Most had a standard ends and sides of four planks that measured 2” 7½’ high. In the early years some had a single centre door, the shorter wagons have two drop down doors, and most wagons have 3 doors. The H class had a tare around 8 tons and carried around 12 tons given them a 5 ton axle load. The all timber frame rode on 4’ bar frame bogies fitted with 2’ 2” wheels. HJ wagons had 5’ bar frame bogies, early wagons had 2’ 2” wheels, whereas the later wagons had 2’ 9½” wheels. These wagon had a tare of around 10 tons and carried 22 tons, a gross of 32 tons (8 T axle load). The maximum speed of the vehicles was 35 mph and were restricted to Goods Trains.   

The wagon carried various types of general goods which included, timber, steel, iron, pipes, farm machinery, tractors, motor vehicle, fuel/oil in drums, tanks, pallets, kegs, ash, bones, bottles, coke, firewood, loco coal for western/branch depots. Track and Bridge materials, sleepers, bridge timbers etc. Many loads were covered with tarpaulins, this included wool, hay, chaff etc.  During the late 60’s they carried sheep. In short, if the load did not fit through the doors of a box wagon, an open wagon was used.

Plan P 112  Drawing # 1313.

Underframe
Bogie Centres
Outside Width
Over Buffers
Height
30’ x 6’ 10”
21’
7’ 6”
33’ 5”
5’ 8”

Inside Length
Between Doors
Between Stanchions
One Centre Door
Drawing Date
29” 8½”
7’ 2½”
6’ 10”
8’
5/1/14

Plan P 113  Drawing # 2250.
Same as above, except wagon has 3 x 10’ Doors. Floor height above rail 3’ 2”.

 Plan P 114  Drawing # 2555. Dated 0578/16. The wagon is 7’ 9” wide and fitted with movable stanchions. 7’ 1” between the stanchions.

Plan P 115  Drawing # 3705.    H and HJ wagon  (2’ 2” wheels) 

Underframe
Bogie Centres
Outside Width
Over Buffers
Height
32’ x 7’ 4”
23’
8’
35’ 5”
5’ 8”

Inside Length
Between Doors
Between Stanchions
Doors
Drawing Date
31” 8½”
7’ 8½”
7’ 4”
3 x 10’ 8”
12/2/26
 
H Wagon
Average Tare
Average Capacity
Journal
Floor above rail 
Bogies
8 T 18 Cwt
11 T 2 Cwt
7” x 3”
3’ 2”
4’ 0”

H J Wagon
Average Tare
Average Capacity
Journal
Floor above rail 
Bogies
10 T 3 Cwt
21 T 17 Cwt
8” x 4”
3’ 3”
5’ 0”

 1969 the carrying capacity was reduced to 9 T 17 Cwt. (Less than the “H” wagon).In 1971 the carrying capacity was increase to 12 T and the classification altered to HH.

Plan P 116  Drawing # 1700.    High sided (6’10¼”) with a single 2’ 6” high door with 4’ 9” bogies with 2’ 9½” wheels.  (Covered under Jumbo HJ a few months ago).

Plan P 117  Drawing # 2208.    Date 5/1/14 HJ Wagon.

Much the same as P 115 for HJ Wagon. Floor height above rail 3’ 4”. 21’ Bogie Centres
Cubic Capacity 571 cu.ft. 1971 carry capacity reduced to 12 T and classed HH.

Plan P 118  Drawing # 4864.    H and HJ wagon  (2’ 9½” wheels)  Date 14/1/44
Much the same dimensions as P 117.  Height of wagon above rail 5’ 9½”

Allowable over load for H wagons 1 T 10 Cwt, HJ wagons 2 T. Cubic Capacity 640 cu.ft.
1971 carry capacity reduced to 12 T and classed HH.

Plan P 119  Drawing # 4864.    UHJ wagon  (2’ 9½” wheels)  Date 14/1/44
Length
Bogie Centres
Outside Width
Over Buffers
Height
32’
21’
7’ 6”
35’ 5”
5’ 9½”

Inside Length
Between Doors
Between Stanchions
Doors
Cubic Capacity
31” 8½”
7’ 2”
6’ 10”
3 x 10’ 8”
600 cu.ft.

Statement of Rollingstock 30th June 1960 shows the following wagon in service.  
Eight wheeled, low-sided goods wagons – 20 tons gross.  H wagons 1,766 (b) 
(b) Three have steel underframes # 11879, 11881, 13926.

The documents also shows 109 on the 2’ Innisfail Tramway, all 12 t gross except 2 that were 20 t gross.

Eight wheeled, low-sided goods wagon – 32 tons gross.   HJ wagons 746 (d)
(d) HJ 19325 is an all steel wagon.
(60 are 32’ long and have bodies 3‘ 6” high. # 6909 – 7005) (Jumbo H wagon P 116)
(61 are painted grey and reserved for Mt Isa traffic)  (UHJ)   
(52 are fitted with molasses tanks) (Mackay sugar Tfc). Reclassed HM in 1973.

With the exception of the UHJ wagons, H and HJ wagons were painted Red Oxide to 1969, then grey. The class lasted until the withdrawal of wooden wagons in 1986/8.  Bundaberg and Ipswich museums have one in their collection on display.

The wagon had drawhooks, H and HJ were classified as “Ordinary” drawgear which later (1973) became D4. UHJ had “Select: drawgear which became D3. The wagon length for train marshalling was equal to 2 F, which later became 2 units. When train lengths went metric, they were 2.1 units. Later that became 10.5 metres, by which time the class was gone.   

Conversions:-

Mainly the “H” Class were used for conversions

CH  Covered wagons during WW II.                         (30/06/60. 185 in service)
HC for stick sugar cane                                             (30/06/60. 38 in service)
HW for water
HK  Cattle wagons                                                     (30/06/60. 57 in service)
Travelling Crane. (Mainly around Workshops)

The H class continued into the modern steel era, HJS in the early 50’s, HSA in the mid 60’s, and HWA (Steel wagon with wooden floor) in the early 70’s. 

Bogies

H wagon. Bar Frame Bogie with 4 foot axle centre with 2 foot 2 inches wheels.


HJ wagon. Bar Frame Bogie with 5 foot axle centre with 2 foot 2 inches wheels.


H wagon. Bar Frame Bogie with 4 foot axle centre with 2 foot 9½ inches wheels.


  H wagon with wool load. Note no securing rings for securing the trap. Ratline tied to door stops, buffers, truss rod, hand brake frame (not hand brake lever or bogies).


I think this photo is a state library photo, the caption indicated the wagon is loaded with 12 ton of wheat. I think wheat is about 12 bags to the ton, around 200 lb each. May be it is chaff. Note, no door stops. (Door stops stop the doors hitting and damaging the axle boxes). Plus, the height of the load beside the attached box wagon ????   


 On a side loading bank, the doors double as a ramp for loading wheeled vehicles.   


This photo was taken about 1973/74 highlighting wagon markings in both metric and imperial.

Some “H” has a sprung canter lever on the centre door. This assisted greatly with closing the door. The standard timber door was very heavy, a two man job. One man could close a door on the steel HJS wagons. One man could close a canter lever door.  


 HC wagon.

 HW Wagon.


 H Crane Wagon.


 HJ Molasses Wagon.


 CH Wagon.

Loading Diagrams


 Wool Load   

Hay Load arrangement


Chaff Loading Arrangements

 The first train I worked out of Mackay at the 67 sugar season was 8 Up. The train ran 3 days a week from Mackay to Netherdale as the Branch Goods. During the sugar season it ran every day and was made up to a full load with cane, sugar or molasses wagons to fill orders up the track. At Marian we picked up a long string of H wagons from the sugar mill to fill cane orders. We changed at Mirani to return to Mackay on another train with a PB up front.  

8 Up was a popular train number around the state, various depots had a train with that number.


 Previously, I indicated I could be short on for open goods wagons when I compare numbers of covered wagons to open wagons shown in the annual rollingstock statements.  Recently I was able to pick up 3 H type wagon kits at “Buy & Sells”. One was a PGC HJ Kit, the others two were Ian Lindsay UHJ Kits. Both are still shown on the internet as being available. The Ian Lindsay costs $ 29.00 and requires bogies and decals. The PGC Kits costs $ 39.50 which includes etched brake lever, bogies, brass air hoses, and decals. Coupling are required for both kits. Both kits have two sides, two ends and a floor/underframe. That is were their similarly finishes. The height of the underframe/sides were different, bogie bolsters were different, one has inside detail, and the others did not.

I like to have my wagons at the correct height above rail so as to look the same as the prototype when mixed with other rollingstock , plus buffers need to be at the same level, and the coupling also need to be all the same level. Wagon heights can very from wagon to wagon within the same class, some wagons have new wheels, others have last turning, some are loaded, others are empty or lightly loaded, this could be four inches plus. As shown in the plans, the bogie type can also alter the height.  
 
 
The drill press with a milling bit go a work out. All were to be H wagons with open loads.


  Train 8 Up on Westgate with the three new H wagons in service.


This wagon has a front end loader/back hoe tractor. This is a GHQ # 61-010 pewter kit, the rear legs were modified to make the tractor fit into the wagon. The wheels are chocked to prevent the tractor from moving during travel. A tyre was inserted between the back hoe bucket and the wagon end for the same reason. If the tractor moves during travel this could damage the unit resulting in claims being made for repairs. Also, if the load moves this could make the wagon unstable and cause a derailment. The tractor was airbrushed with Tamiya X8 Lemon Yellow enamel. The lack of inside door detail is noticeable.   


These machines in wagons are often outside the loading gauge. A loading gauge was made from styrene to test clearances.
Not a lot of QR stations had loading gauges, high loads were often gauged using a locomotive cab or a QLX/ALY wagons.


This wagon has a tractor crane and ships tanks. About 12 months ago I saw the crane sitting on a farm near Taree when on holidays. A few photos were taken for “a someday” project.


The tractor was located in the scrap box without front wheels. The front wheels were also located in the scrap box. The crane jib was scaled out on graph paper to suit the tractor and made from styrene “Evergreen” strip. Like wise for the front frame. The unit was airbrushed with Humbrol # 47 “Sea Blue” gloss enamel. The ship tanks, I bet you are thinking old uncle Arty has lost his marbles. Back in the 70/80’s, Rural Fires would have them made and they would send them all over the state to assist with water storage for bush fires. Again, the crane and tanks are secured with timber to prevent movement during travel. After I finished the model of the tractor crane I was advised there was two similar units just down the road at Rocklea.  Mates ??? I guess that is the plus in hosting meetings and having others around to discuss things.


The final wagon is loading with farm machinery. The bailer is a Wiking model I picked up at an exhibition on sale. The stump jump and disc plough is scratch built using photos found on the internet. They were make from styrene, wire and Kadee coupling springs.  The stump jump plough was airbrushed with Tamiya X7 Red and the Disc plough painted with Humbrol # 47 gloss. Some parts were hand painted with black to finish the model. A few boxes of parts was added to the floor to finish the load. This wagon has inside door detail and adds to making it all look real.


The wagons were airbrushed with PGC “QGR Oxide”, below the solebar was hand painted black. On the prototype, some wagon the inside was painted the same as the outer sides, other it was just bare timber. There are many articles on how to achieve stained/weathered//bare timber, at the end of the day the model is viewed from a distance. For these I was looking for something quick and simple. I used Model Color # 70.988 Khaki (acrylic), and dry brushed some AK 723 Dust to add a little texture.


In trying to be too simple and quick to finish off the exterior of the wagon, being lazy I guess. I ended up with a poor finish. After applying the number decal I tried to dull the gloss lacquer finish by applying weathering pigments with a water wet brush, what a mess. A few days later I applied Dullcote with a brush, you guessed it, and most of the pigments came off.  The price one pays for taking short cuts, next time I have the compress out I will consider the usual method with the airbrush. Of late I have been trying Tamiya enamel instead of the Humbrol paints. It comes in a screw top glass bottle as opposed to the tin. Getting paint out of a tin is messy and I end up with paint on everything.   


After finishing the wagon with the inside detail, there is a good chance at the May show I will try to purchase two wagon with the inside detail. The tractor loads have not been glued in. Then the two without inside detail will get a trapped or a full load.   Maybe a couple of wagons loaded with wool would be nice??


This wagon of timber has been on the layout for some time, it’s a Far North Hobbies kit with the larger wheels.

 
Trust you find the information helpful.