Tuesday, 2 August 2022

CLV Guard Vans

The 1963 list of classes of Coaching Rollingstock Book shows a CLV as a Composite (First and Second Class), Lavatory Brake Van. The list shows a total of 154 vans with 24 variations.


The length of the van’s bodies varied between 32 ft. and 50 ft. and they carry between 20 to 54 passengers. Most have two compartments, one first class and one second class with each compartments having their own lavatory. Some longer vans have two compartments for each class, some of these vans had a compartment signed “Women and Children Only”, ARHS (Qld) Sunshine Express January 1975 showed CLV 1011 as having this signage. 

CLV 1022 Cairns 1978. A class mate to CLV 1011, a total of 27 vans in this variation, 20 -1st class and 34 - 2nd class passengers. One compartment of each class carries smoking signs. Not a lot of room in the Guards compartment for parcels/roadside, looks like the dog box area was used to add gas bottles to provide the guard with cooking rings and heater. A similar type van with a larger guard’s compartment was used on the Dirranbandi Mail in later years.  

Some vans had reversible 1st and 2nd boards to change the class subject to requirements. In the early 1970’s some compartments where were marked as smoking compartments. During this period, 2nd class was reclassified to Economy class which didn’t carry any markings / signage. As one would expect with some many variations and QR being QR there would some unusual unique vehicles. One such van being the end veranda Davison Vans with a centre Guards compartment, even within this style there were five different variations
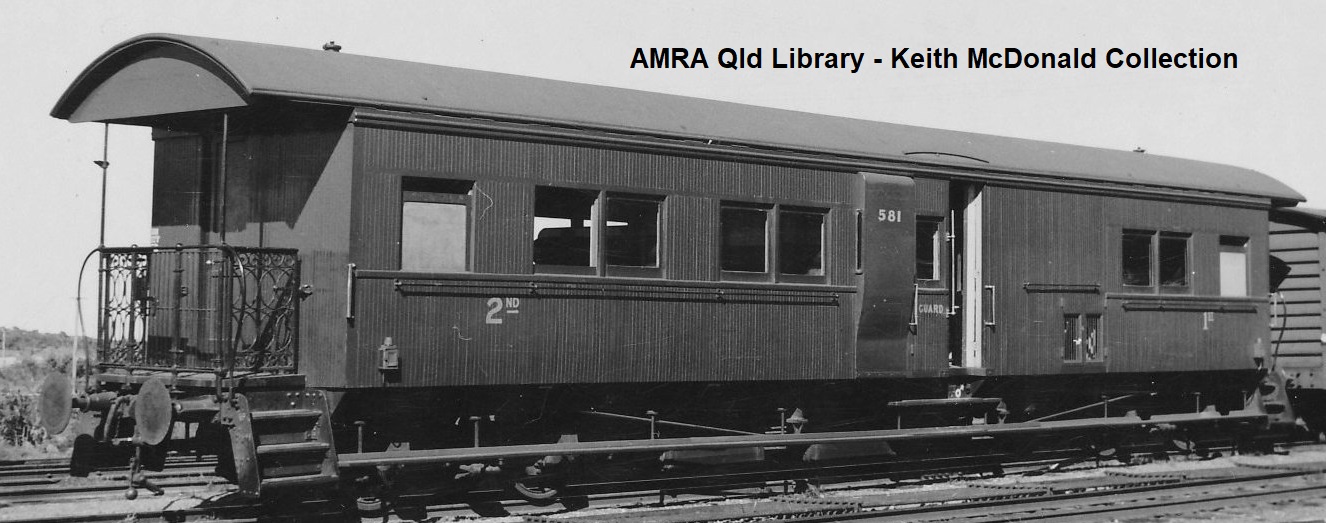
CLV 581 after rebuilt in 1935. Toilets moved to the ends and one dog box. Seven - 1st and 17 - 2nd class passengers. 

The first guards van I built was one of these back in the mid 1970’s before scribed styrene, bogies and decals were available. Showing its age (hit the floor a couple of times over the years) the van is still operational on the layout today. Maybe it’s time the van went to the Westgate Museum and I should add a replacement to the project list. 

CLV vans could be observed on most trains around the state, the larger vans being used on mixed trains on main lines and the smaller vans on Branch lines where a service had passenger accommodation. Mixed trains were goods trains with passenger accommodation attached, most travelled at 35 mph/60 km/h due to the class of wagons on the train, F, H, C, ALG etc. By the mid 1960’s a couple were travelling at 50 mph/80 km/h, these trains conveyed red diamond and circle wagons only. 30D on the Mt Isa line was one such service. Some of these mixed trains had a sleeping car as well, given all carriages/vans were of wooden construction they were marshalled at the rear of the train. The good book (Rule Book) stated that wooden vehicles conveying passengers were not to be marshalled between steel vehicles. Many modellers think a mixed train is a train conveying a mix of wagons, various classes or freight types, that’s not correct. Mixed trains run under the same operational rules as a passenger train. 

Going back to August 2019 blog I spoke about 6 Up and 19 Down were CLV van was used on the Toowoomba to Roma Passenger service and the CLV continued to Charleville as mixed train with a sleeping car. May 2021 blog there was a CLV on the Brisbane to Maryborough passenger service that went to Kingaroy. November 1969 Working Time Table shows the marshalling for Train 54 A from Rockhampton,

CLV Van

Springsure Road & Milk Wagon (CR)

Springsure Van,

Blair Athol Van

Blair Athol Road Wagon.

Blair Athol Cars (KCS)

Blair Athol Loading

Western Road Wagon

Western Loading in Station Order

Springsure Loading

Emerald Loading.

The November 1983 Working Time Tables shows the following marshalling for 54 A Express Freight Train on Sundays from Rockhampton.

CLV Van Springsure

CLV Van Blair Athol

Blair Athol Road.

BL (Second Sitter). Blair Athol

CLV Longreach

Express freight Loading.

By the mid 1970’s, passenger traffic was dropping off and many of the CLV were modified and reclassed BLV. The guard’s compartment was extended into the adjacent passenger compartment, often giving the guard a toilet. Also, around this time gas cooking rings and heaters were being provided for the guards. The additional area became handy for this equipment and gas bottles.

Of late I have been adding/making a number of Guard Vans for the layout. Most of the CLV’s were longer vans between 40 ft. and 50 ft. I like the look of shorter vans on the layout. To me on the layout, a 50 ft. guards van on the back of a train conveying a string of four wheeled wagons looks out of place. I know in the real world it happen regularly. I feel a smaller 30 ft. van fits the deal better, given on the layout we have limited room. So, for this project I have picked a later 32 ft. wooden van.     

In 1950/51 twenty (20) CLV vans # 1392 – 1411 entered service. They were built to a newer profile with a wider and higher body with a rounder roof. The average tare weight was around 15 ton 17 cwt and they carried 9 first class and 17 second class passengers. The guard’s compartment was basic with the side look outs on both sides and dog box, just over 10 ft. for the guards and roadside for the trip. The van rode on angle iron bogies at 21 ft. centres fitted with 2 ft. 2 in wheels that were 4 ft.  6 in apart.  The gross allowed load was just 20 tons. Standard draw hooks and electric light was fitted. 

Van 1392 was destroyed in 1957 and van 1411 destroyed in 1959, the plan show vans 1403, 1394, 1408 were also written off, date not known. Van 1398 was converted to a BLV, the first class section was boarded up and became part of the guard’s compartment giving the guard the first class loo. Gas bottles were fitted to one side providing a gas cooking ring and heater for the guard. During this modification, the angle iron bogies on some vans were replaced with ride control type, QR 4/5 type fitted with roller bearings, or other similar bogies. 


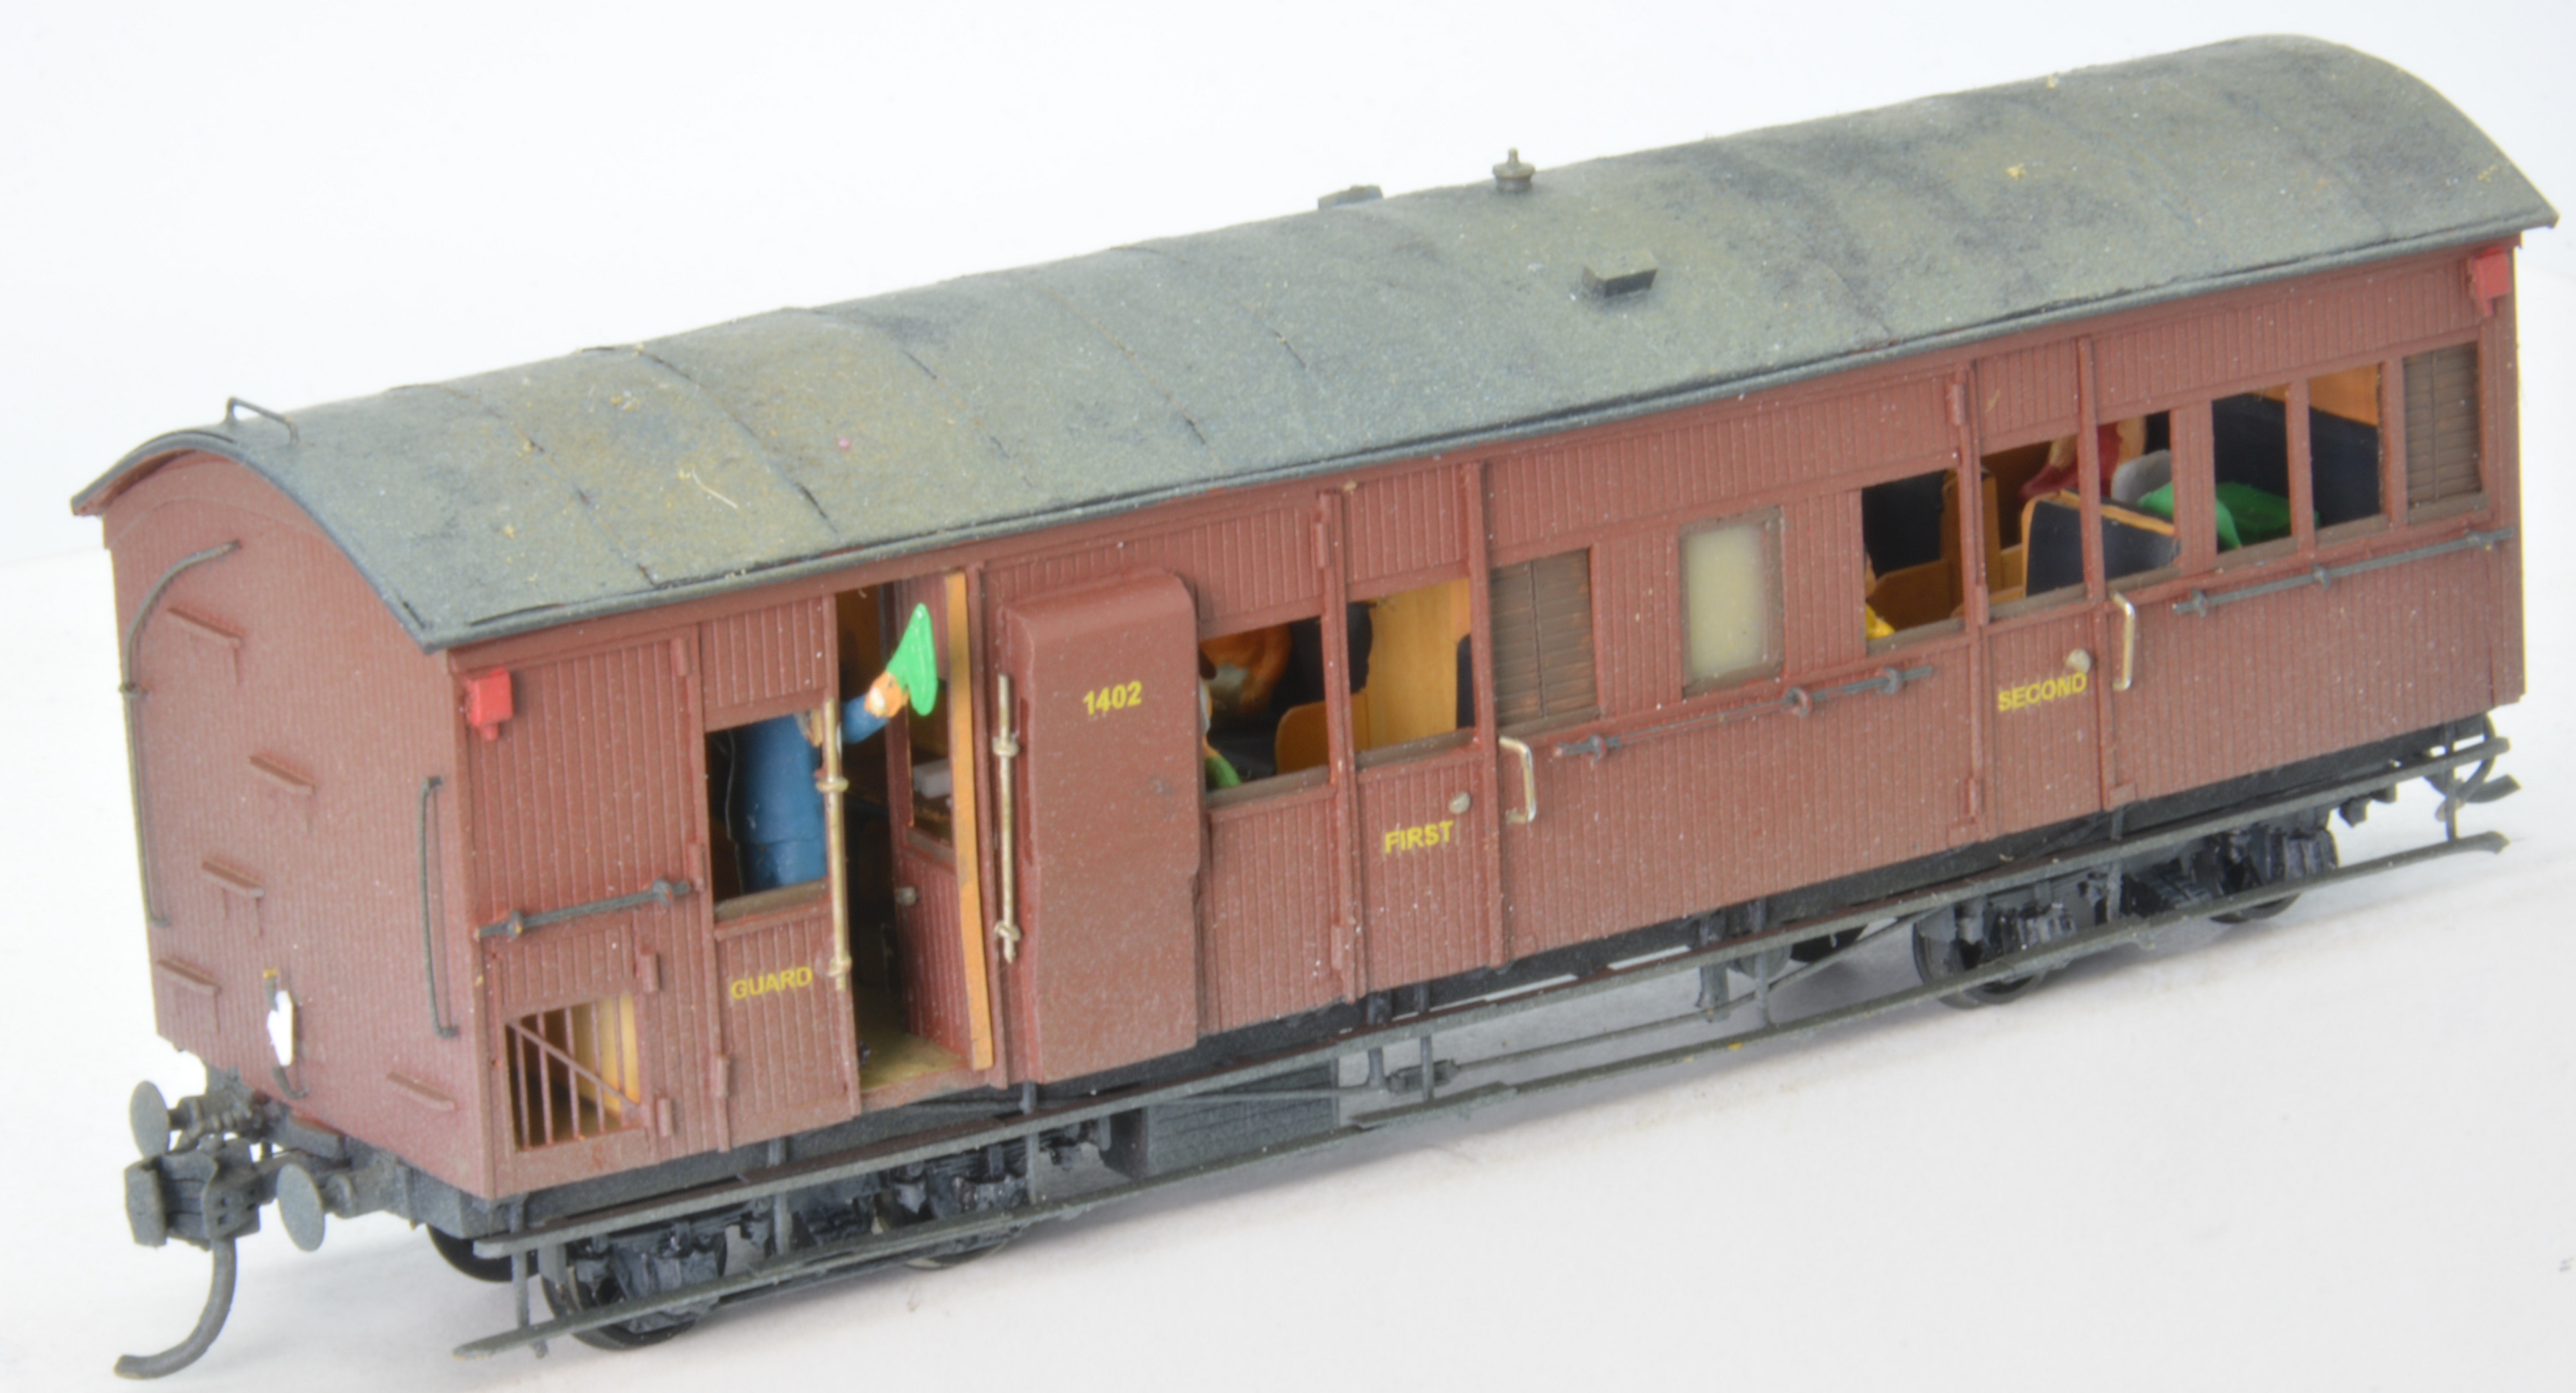
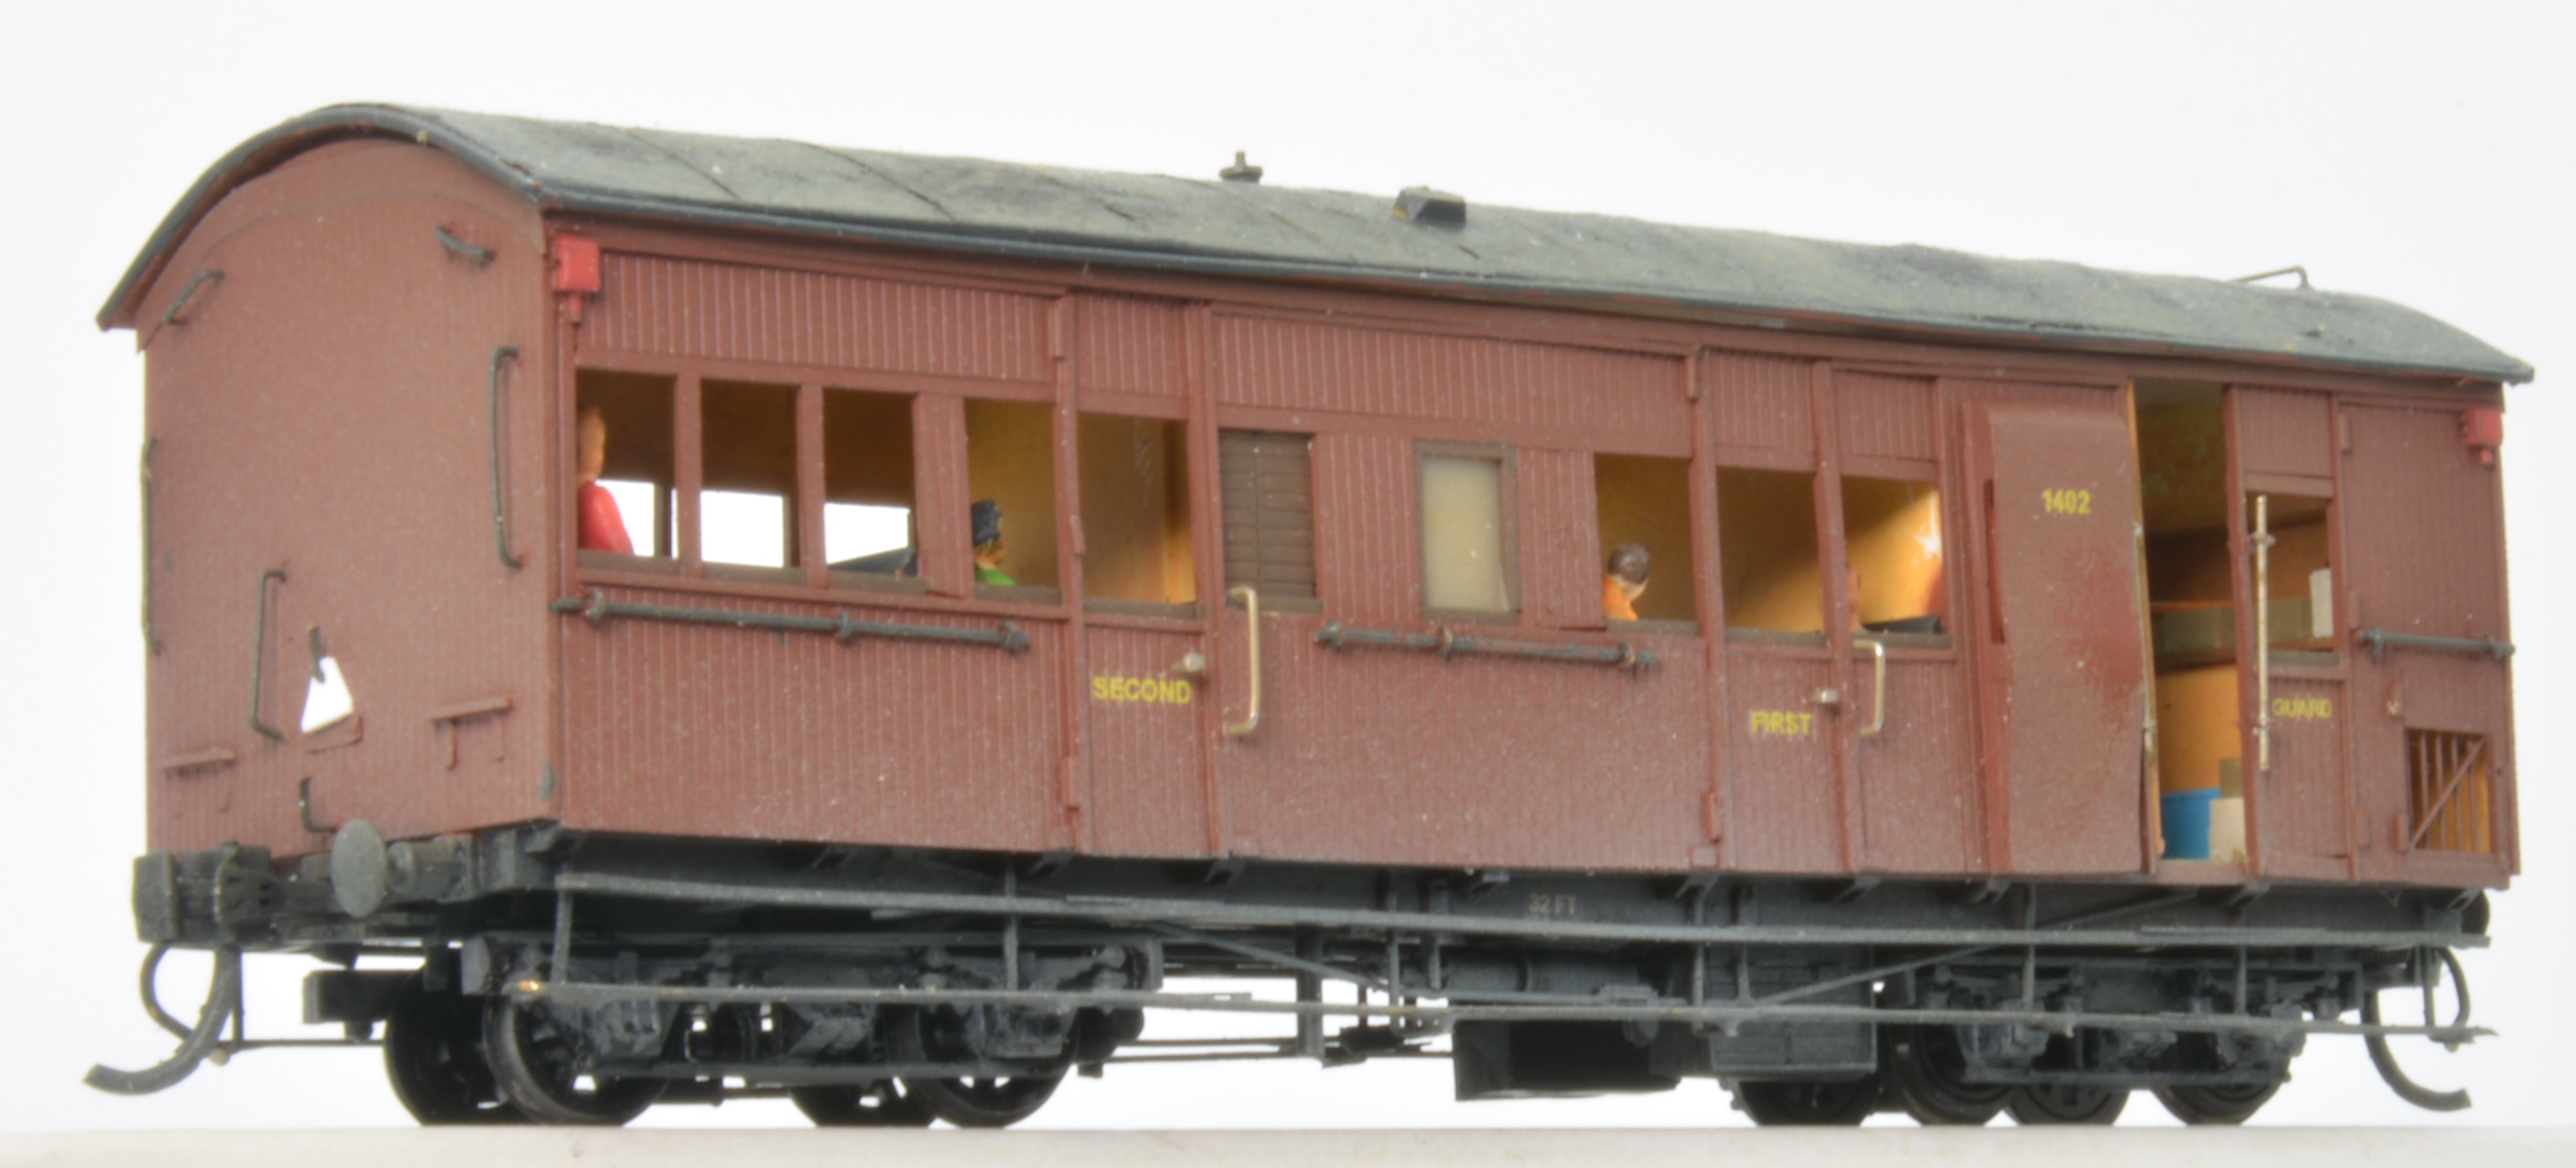
BLV 1402 still has Bar Frame bogies, no dog box and one window enclosed in the economy compartment. .

BLV 1400 Pioneer Steam.

Carriage Plan P341 shows the following vans were converted to BLV’s. 1980/01 # 1398, 1393, 1395, 1397, 1399, 1400, 1404, 1405, 1406, 1410. In 1983 van 1396 was also converted.  Van 1400 is at Pioneer Steam at Box Flat, and van 1401 is part of the AHRS collect at Rosewood (Kunkala).   

I understand the vans were known as Moriarty vans, the commissioner that came to office shortly after vans entered service, the term was not used all that often like some other vans and carriages.   

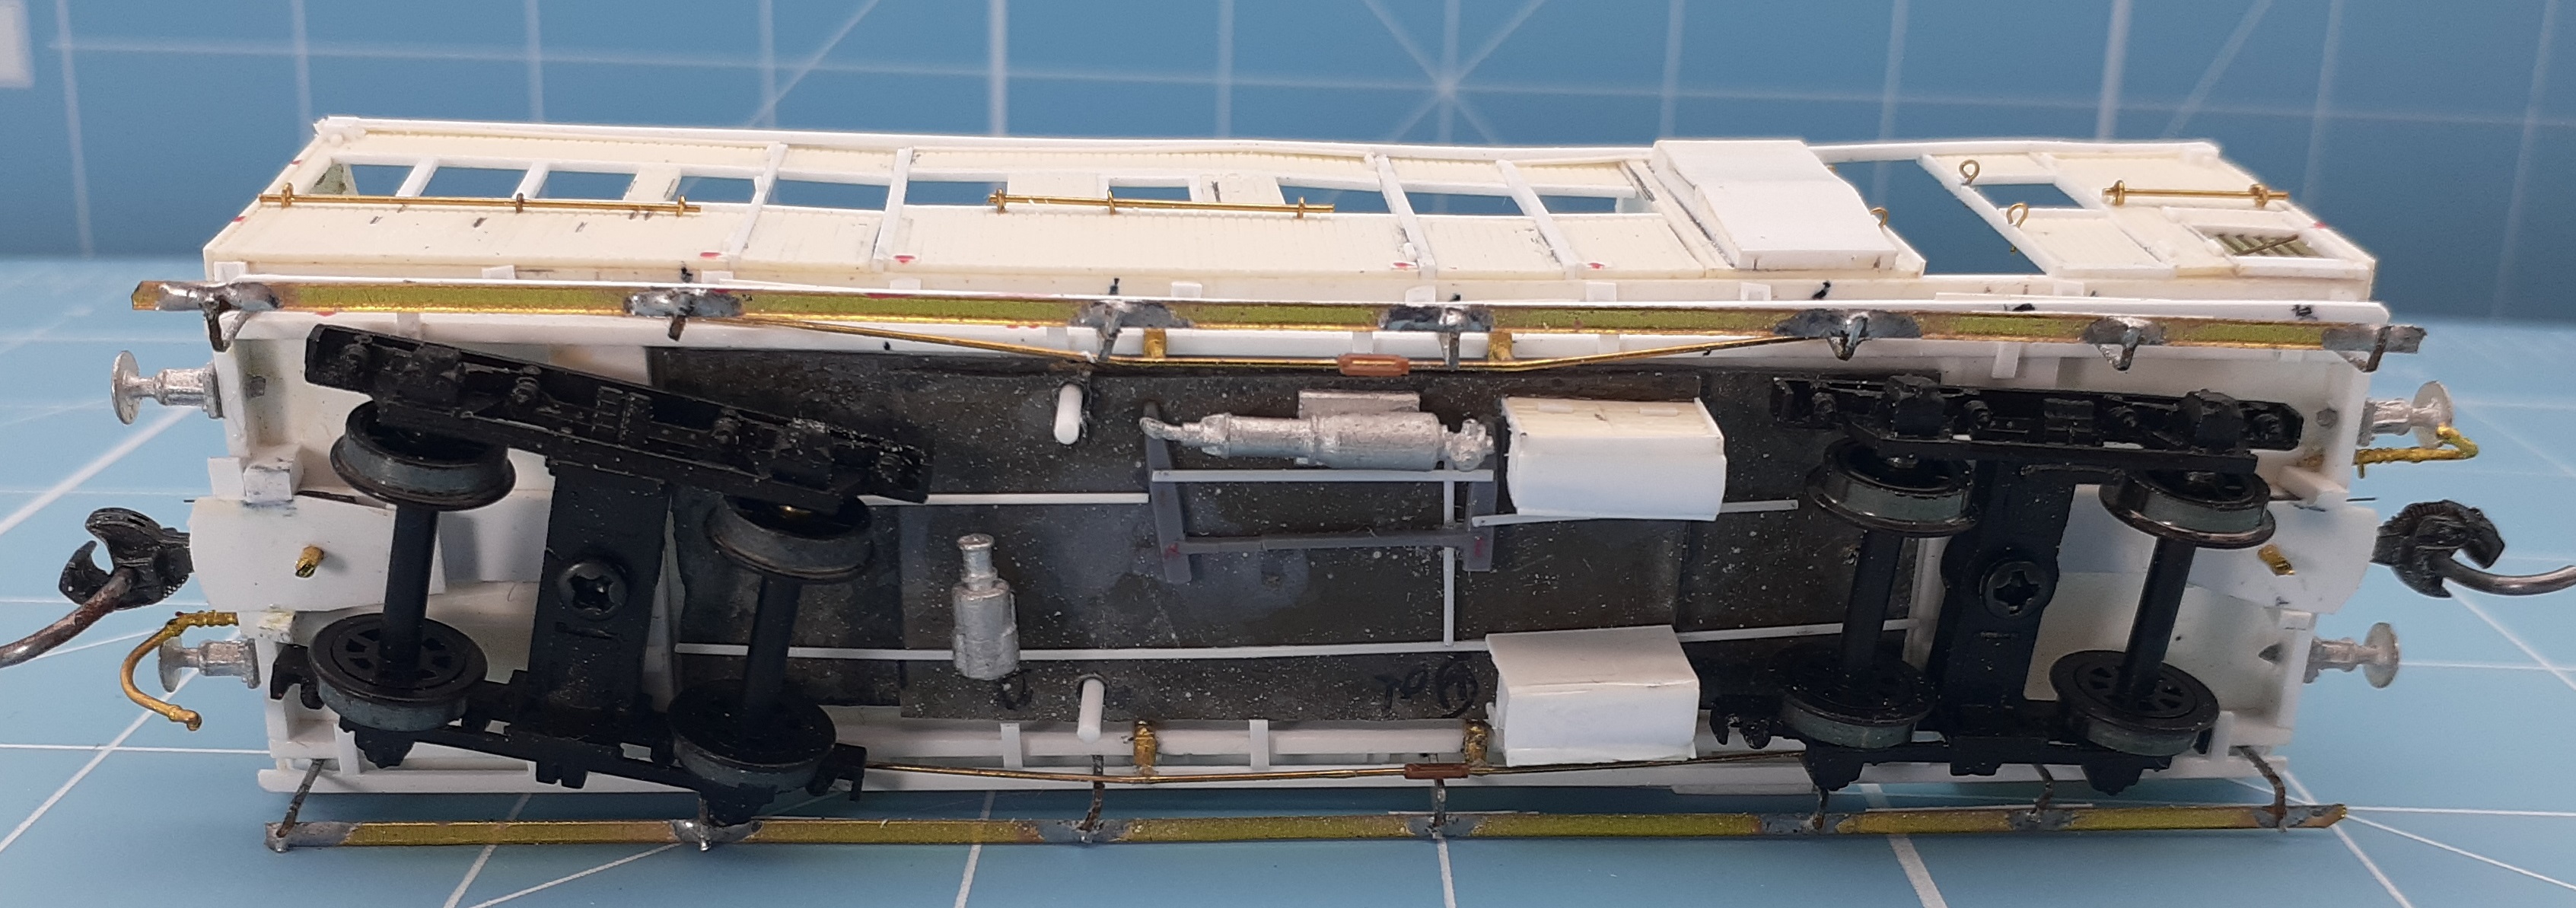
Model:- The van was made using scribed, sheet and strip styrene. Again, the windows were made in the down position except the toilet window. The Guards doors were made and fixed in the open position. After painting, some windows had shutters /blinds fitted.  Caintode Flats bogies, CFB 8S Passenger 4’ 6” w/b fitted with 2’ 2” wheel were used. Drawgear used was Kadee # 158 whisker couplings. Seats, toilet fitting and goods items were fabricated from styrene sheet/strip. 


Roadside work has been completed and right away has been given for 19 down mixed to leave Westgate.


I have been air brushing my models for many years, I feel it gives a much better finish than what I can achieve by hand painting. Over these years I have used various types of air brushers and compressors. There is quite a cost with setting it all up. Most of my painting was done outside in the fresh air with a breeze blowing to help blow the paint toxin’s away from me. For many years I used Floquil paints until they were no longer available. Shock, horror, just as you master something, it no longer available. Setting it up was another story, many trips between the workshop and the BBQ area. Often painting was put off until the setting up was worth it. Often a number of projects would be on hold waiting for a nice find day to be outside. 

Towards the end of last year at a NMRA meeting, a member showed a couple of hoseless/cordless mini air brush units he was playing around with that he purchased on EBay. A mate from Wednesday Workshop had also made a comment on them and was wondering how they would go. A few weeks back I watched a YouTube video on painting figures by a modeller in Melbourne. He used one of these air brushers to add a primer to the figures he was about paint. (https://www.willjamesrailways.com/) 

Checking out the “Neat and Handy” (www.neatandhandy.com) website I found they had a warehouse in Melbourne, they stocked various goodies for the modeller/hobbyist including spares parts and accessories. After some consideration I desired on purchasing a basic unit for $ 77.00 delivered. The unit arrived within four days and was put to the test. At the time Brisbane weather was more like UK weather, cloudy and raining most days without any sunshine. The forecast for next week was more of the same without any fine clear days. The pack contained a double action airbrush fitted with a .3 mm needle, three paint cups, spanner, recharging cord, adaptor, and a pipette. The unit recharges in approximately 60 minutes and runs for about 20/30 minutes on a charge, the unit delivers air at approximately 20 psi. Information on the website suggests some popular brands of airbrushes can also be fitted to the compressor/battery unit. My Nozomi (Runway 13) airbrush has the same thread (⅛” BSP) and it fits straight on without any issues, but my Badger airbrush will not fit. After purchasing the Runway 13 airbrush a number of years ago to overcome the two different thread types with one hose from the compressor I fitted “quick-release” adaptors that where purchased from Runway 13.   

The CLV van was the test model for the new airbrush. A mix of paint types was used and a full list of paint used is below. I also painted two other Guard Vans at the same time using the same paints. Painting the various colours and allowing additional drying time I found the run time was more than adequate and at no time did I run out of air. At times there was a day or two between each coat of paint. The spray was very fine and the small cup is all that was required. Holding onto the base and pulling back on the trigger can be tiring if done for extended time. The airbrush has a needle stop allowing you to adjust the needle travel, great for weathering. This is a feature I don’t have on my $ 200.00 airbrush I have been using for years. Thinning of the paint was done in small plastic type cups to consistency of milk, pull the stirrer from the paint and most paint will leave the stirrer. The inner working of the brush is very similar to other airbrushes I have. A deep clean (pulling the airbrush apart and cleaning all parts internally) after completing jobs for the day was similar to the other airbrushes and only took a few minutes. 

Being a good solider with two left feet sometimes things do go a bit turkey from time to time. Cleaning the airbrush at the end of a job I knocked over the unit and it went base over apex onto the table without the needle protector in place. Yes, you got it, the needle point was bent and the air around the table turned blue. I have dropped one or two airbrushes over time and bent a few needles, but, this was the granddaddy of them all with the needle point at 90 degrees. With pliers the needle was straighten to a point where it could be removed from the airbrush. Rolling the needle point between two hard surface straighten it into a point again. The following day the airbrush was used and all was OK, the spray may of have had a bit wider than previously. I guess the lesson learnt is to remove the needle before removing the needle protector on the front of the airbrush or unscrew the airbrush from the unit before cleaning. 

A replacement needle and nozzle ($11.00) was ordered, given an order was being placed I decided to order spare “O” rings ($14.00) and a quick release /air pressure regulator adaptor unit ($23.00). Shipping was $11.00. After ten days the package was shown as delivered but could not be found at my address, after a couple of emails a second package arrived four weeks after the original order. The quick release adaptor was not comparable with my Runway 13 units on other airbrushes I have. I does make it easier to remove the airbrush from the compressor and doing so there is less chance of bending another needle.  

After a couple of days of use with various small jobs without recharging I ran the airbrush until there was no air. At the time the cup containing Model Color water based acrylic paint. The small amount of unused paint was tipped out of the cup. A deep clean was carried out using paper towel, a small stiff artist brush, cotton buds and a pipe cleaner. In packing up I left a small amount of cleaning fluid in the airbrush. The following day some weathering was completed without any issues. The manufacture suggests you do not run the airbrush when hooked to mains power. 

Paining has become much easier with the cordless airbrush, setting up is much quicker, most of the equipment needed with a standard airbrush is not required. I now take one tray with everything I need. A big plus is you don’t have a compressor drumming away in your ears or frightening the daylights out of you when the thing starts up in the middle of a paint job. The unit successful applied all the paints I use in today modelling projects. Awesome for small jobs and a very welcome item to the workshop tool box. If you were staring out or your modelling area is limited, these units give you the opportunity to airbrush your models on a small budget.   


Colours Used.

Interior Walls:- Vallejo Model Color (Acrylic/water based) - # 70.860 Medium Flesh Tone. Air Brushed thinned 50% paint, with 50% with thinners (Thinners was made up using 70% Flow Improver, 30% Thinners, with a couple of drops of retarder. All Vallejo products)

Floor Guard’s Compartment::- Vallejo Model Color # 70.988 Khaki  (Hand brushed)

Floor Passenger Compartments:- Vallejo Model Color # 70.941 Burnt Umber (Hand brushed)

Seats:- Vallejo Model Color # 70.862 Black Grey (Hand brushed)

Window frames and Shutter:- Vallejo Model Color # 70.941 Burnt Umber (Hand brushed).

Roof:- Vallejo Model Color # 70.862 Black Grey (Hand brushed)

Vallejo Model Color paints are water based acrylic paints. 

Exterior Walls:- PGC QR Passenger Red. (Air Brushed – Acrylic Lacquer thinned, 50% paint, with 50% with lacquer thinners). Paint was thinned to the consistency of milk, paint runs off the stirrer when pulled from the paint)

Underframe:- SMS Chassis Black (Air Brushed – Air brush ready, pour straight from the bottle into the air brush).

Side Lights:- Vallejo Model Color # 70.957 Flat Red (Hand brushed)

Hand rails were hand painted.

After decals were added and allowed to dry, the model was sealed with Testors Dullcote          (Air Brushed – Dullcote thinned with 50% with lacquer thinners).

Passenger and Guard were hand painted using Vallejo Model Color paints.

Weathering:- The following colours were used and applied with the air brush. All these paints are water based acrylic paints designed for airbrushing, a small amount thinners  was used, same as above used with Model Color.

Vallejo Model Air # 71.139 US Field Drab.

Vallejo Model Air # 71.133 Dirt.

Vallejo Game Air # 72.762 Earth.

AK Interactive AK 723 Dust.

Bogies The Caintode Flats white metal bogies were air brushed with Mirotone Etch black and then the bogie side frames were hand painted with Mirotone etch grey.

Other similar CLV Vans.

There were similar style vans that were longer (40 ft. and 50ft) that were build much earlier from around 1914 onwards. Earlier vans had crown lights above the doors and windows, later van this was replaced with match wood. 


CLV 1163 Corinda. 

Caintode Flats Models produce two kits of a 40 ft. version CLV van. 1914/25 Southport (Relief) Van and later (1077) CLV van used in general traffic. These two are of the general traffic type.


The last batch of CLV to be built was between 1953/55 numbers 1562 – 1581, they were the 50 ft. type. 
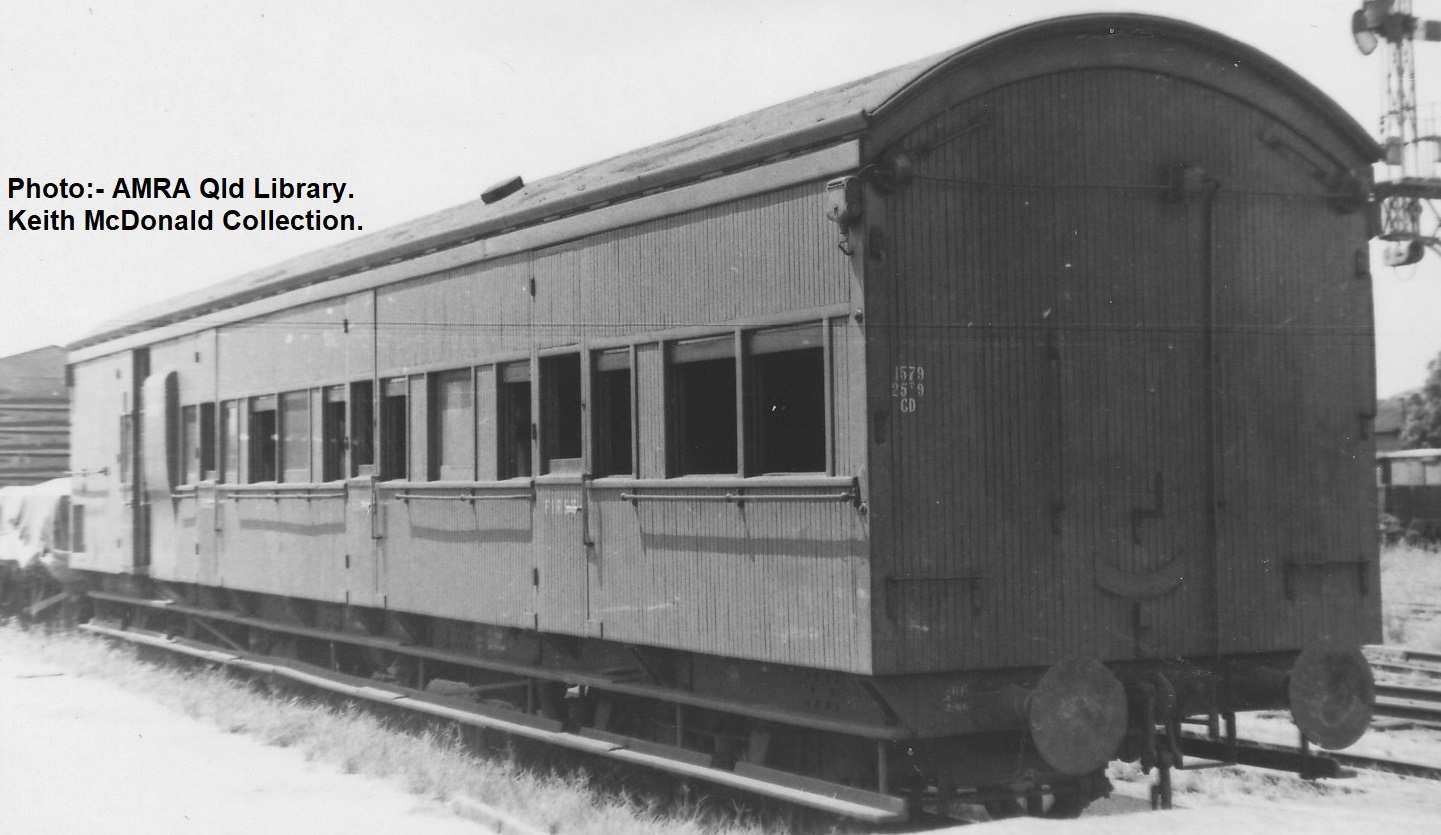
Four 50 ft. vans can be found in museums at Ipswich Workshops, Rosewood (ARHS), Gin Gin and Winton. May be one day, I might add one of these to the layout???   

To cover all CLV vans on the QR network would take quite a bit, some variations there was just one or two of that type. 

Trust you found the information helpful and of assistance. 

There is more vans in the workshop for the next post. 

Regards,

 Arthur H. 


Monday, 4 July 2022

SDS/CGL – PCO/PCUY Wagons.

Last week my two packs of SDS/CGL PCO wagons arrived in the mail. I ordered PCO wagons as they entered service fitted with buffers and ran on the QR network with them on for a number of years.


PCO, PCOP, PCOY, PCUY wagons were one of the most versatile container wagons on the QR network. They could be found in all corners of the state, in all types of traffic.  Many were allowed to specific traffic, sugar, bitumen, gypsum, coal, fuel, pipes, steel, spoil, cattle, to name a few. The wagons could be found on trains in one or twos, and anything up to a full train. The first test train for 100 km/h running on the NCL used PCOY wagons. As part of the NCL 100 km/h project all contracts and classes were grouped into one, the PCUY class. The class entered service as container traffic was exploding in both overseas and domestic markets. Gross mass of containers was increasing as well their overall height. Most of QR container fleet at the time were converted flat/platform wagons and were very limited in what they could carry.  

The PCO wagons were designed around carrying two (2) 20 ft. containers with a gross mass of 24 tonnes or one 40 ft container with a lower floor profile. Other length containers with 20 ft mounts could also be carried if required. SDS and the CGL website cover the prototype information in more detail. 

SDS_Models (sdsmodels.com.au).

http://www.cglmodels.com.au/pco-pcuy.aspx.

The website also shows the main characteristic that went into the construction of the models. Being a medium length wagon, they will look at home on any layout.  After the usual inspections, buffers were added along with a few containers, and then to the layout for a run. 


Up until the mid-1990’s, only one bogie on a wagon was fitted with VTA brake change over valve (loaded/empty detection). Instructions were issued that when wagons were loaded with one container, the container was to be loaded over the hand brake wheel. This avoided heavy braking of the wagon and flat wheels. With the 100km/h NCL project and newer wagons, loading sensing devices were fitted to both bogies. 


One bogie on the model as per the prototype is fitted with a VTA brake change over valve. The bogie side frames carries the same markings as the prototype QR 38 bogies. Brake blocks and shoes are also part of the bogie. On the track they run freely, if the layout has any ups or downs, the wagon simply roll away. 

The wagons are fitted with adjustable coupler boxes. The wagon comes with the coupler set for H0, that is, the coupler centre is 9.92 mm above the rail. QR plans for more modern wagons show coupling height around 787/9 when loaded. In some cases, on container wagons, it is lower. Empty wagons are shown around 830 mm. In H0 terms that is 9.04 mm loaded and 9.5 mm when empty. Us modellers who model older timber wagons, the drawhook is centred at 2ft. 8ins above the rail, or for H0 modellers that is 9.33 mm. The coupler box on the PCO wagons have a plate within the coupler box that can be changed to the top of the coupling shaft, reducing the coupler down to 9.32 mm above track level. If the .6 of a millimeter effect your operations, changing the coupler height is quick and easy. I did one to see what the difference was, the rest was left alone. 


Changing the coupler height, the coupling trip pin will also require adjustment so it will not foul the top of the rail. On the prototype anything up to half a couple jaw was acceptable for traffic. Plus, on the prototype there are differences with in the class, there is loaded and empty wagons fitted with new wheels and last turning wheels. It can add up to quite a bit resulting with various coupling heights across the entire train.


Marking on the wagon is what dreams are made of, it all there to the correct size and readable. Builder’s plates, axle test dates, brake service information, reflector, handbrake on/off with arrows, drawgrear class, length, tare and carry loads for all lines.  


The detail under the wagon is spot on, brake and branch pipes, various pipes connecting brake cylinder, WF triple valve and auxiliary reservoir are included, even pipes to and from the VAT valve are on the model. The brake cylinder piston foundation lever has chain connected to the hand brake. Pull rods run from foundation levers towards the bogies. On the ends there is bifurcated hose bags and coupler release levers. 

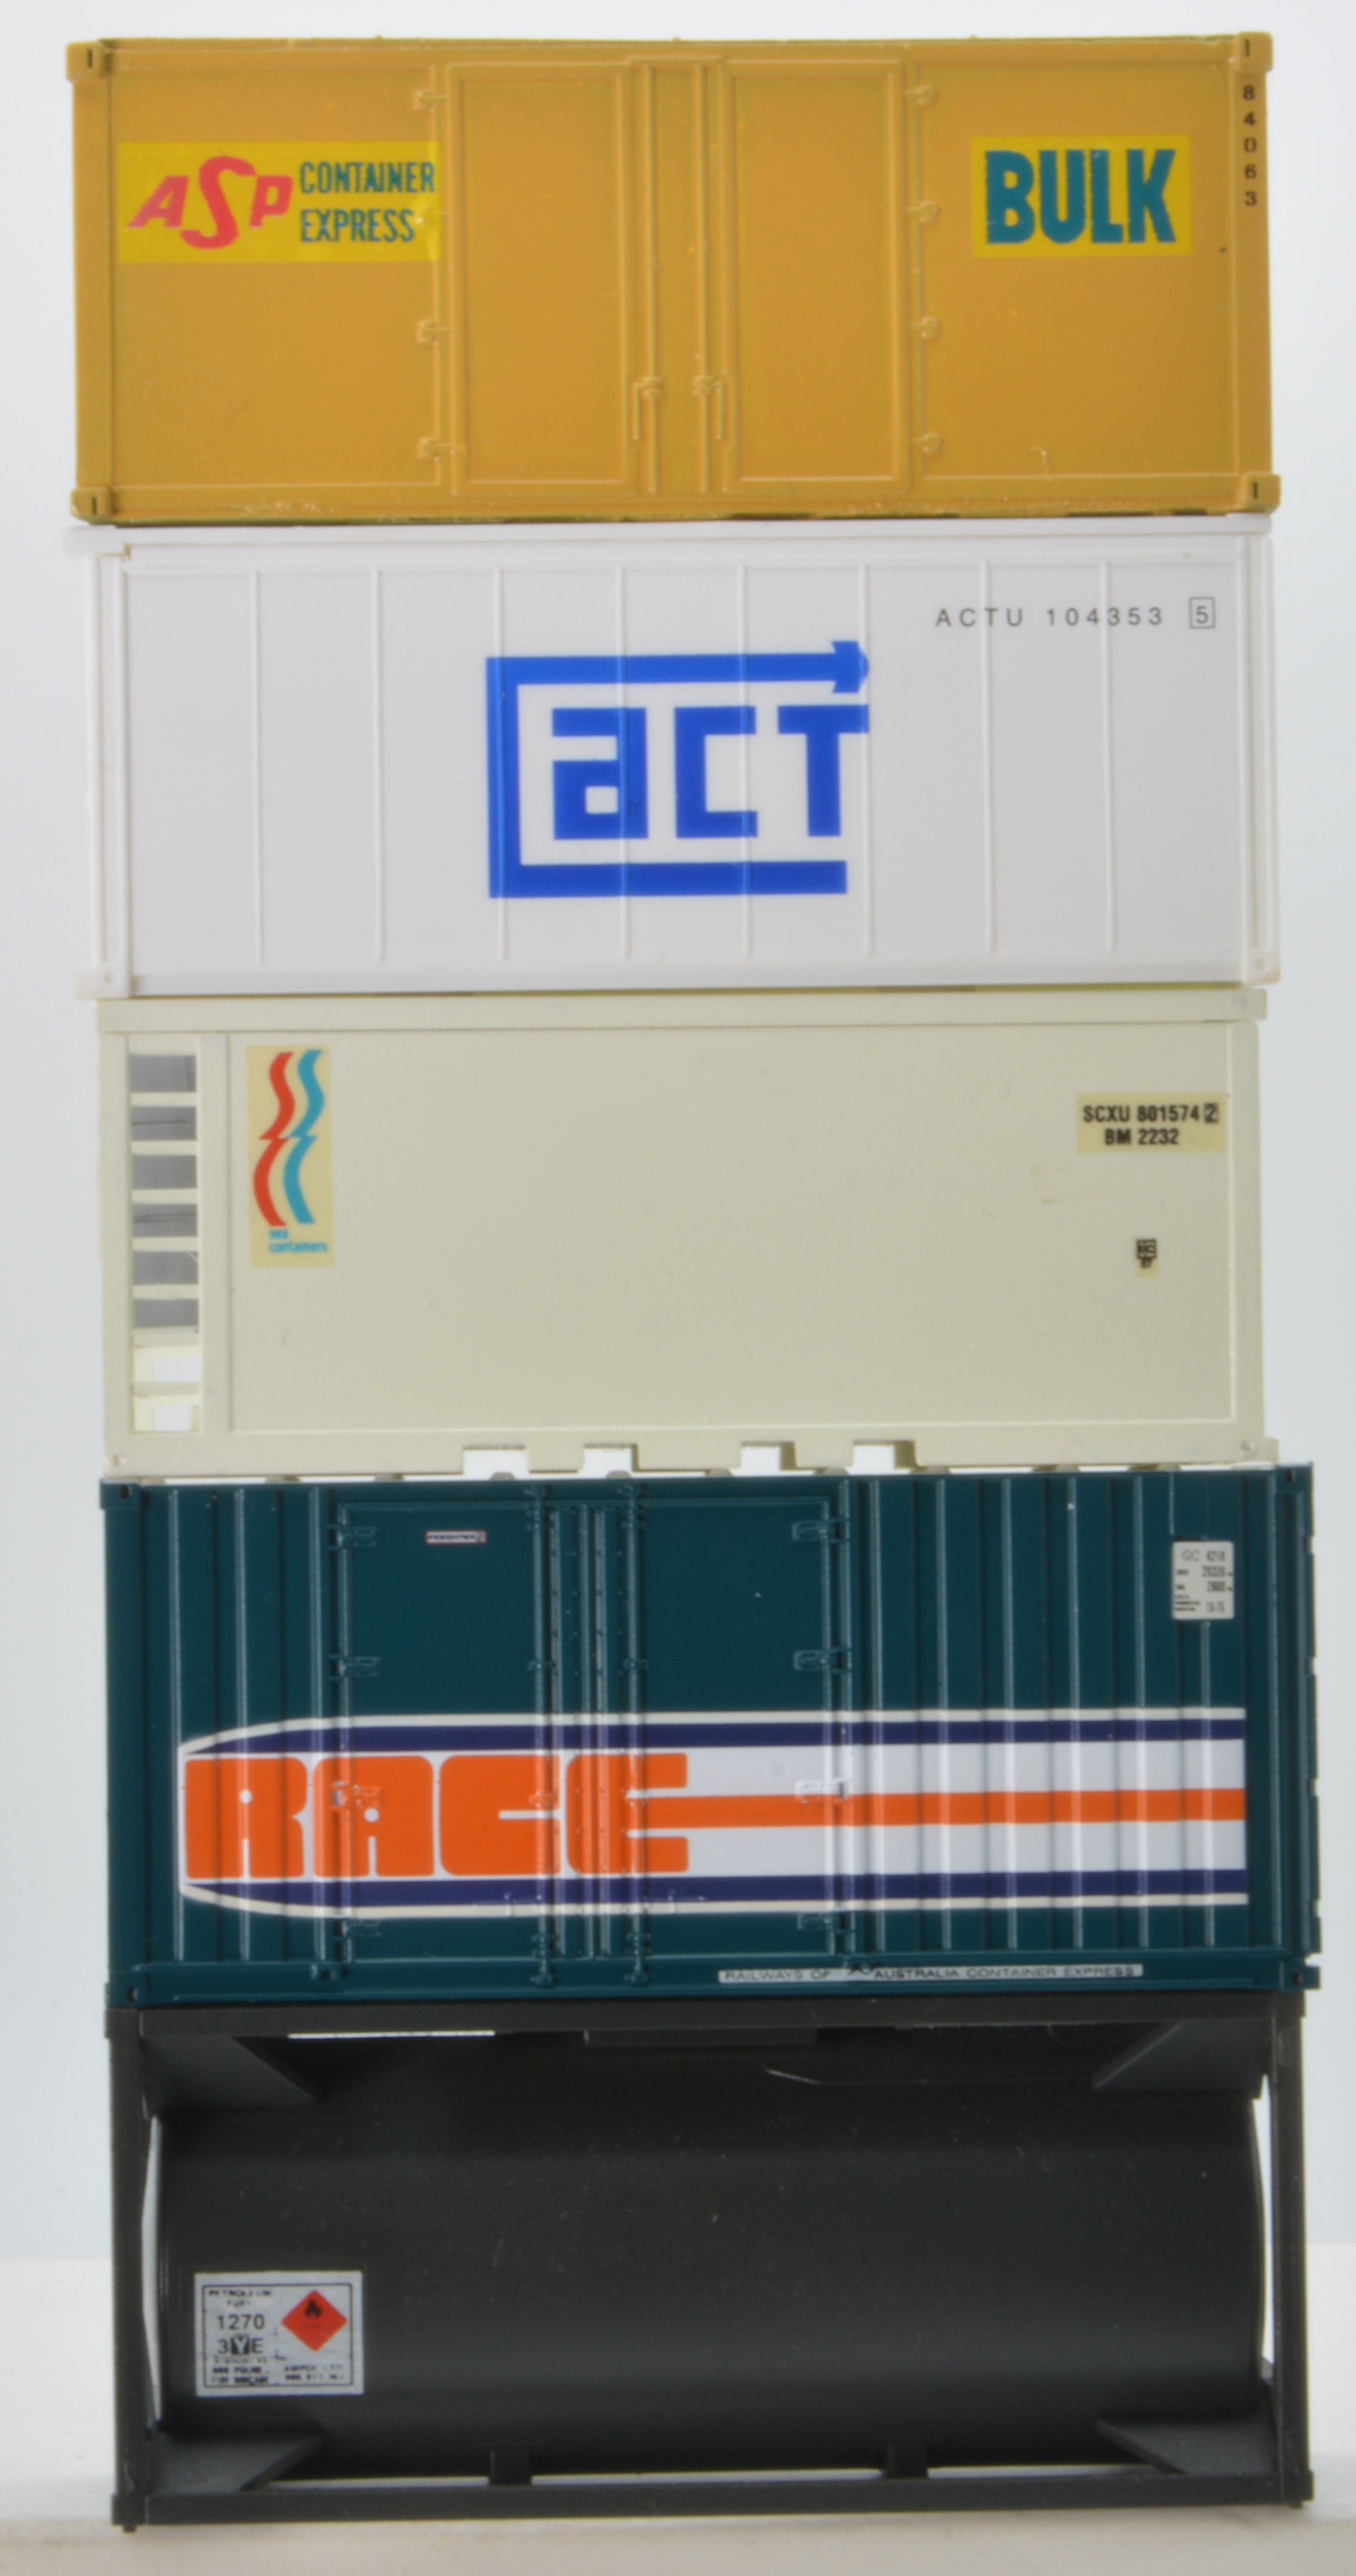
Mounting Containers. Over the years there has been various manufactures of H0 containers, each have their own method of securing the container to the wagon.  


Walthers Tank Container (kits) has pins mounted to the bottom frame to secure the container to the wagon. I guess this requires holes in the floor of the wagon. (I assembled five of these kits, only the last one was done correctly ???) 

Lima Container.


SDS Container. Recess slots in the corner for mounting container on wagons fitted with twistlocks. (I think twistlocks on the floor of an empty wagon looks much better than holes in the floor).


Not all 20 ft. model containers are the same size. Some scale out as 19 ft long.

The prototype PCO wagon has spigots on the ends and retractable twistlocks in the centre of the wagon. The wagon has been modelled with uniform container mounting heads of the twistlock type to make it easy for us modellers. A plus for modelling container wagons is the containers can be changed and swapped around with various loading figurations. No two running sessions need to be the same. Over the years I have collected containers from buy & sells, purchased them on sale, scratch built a few etc. etc. Yes, my container fleet is a box of all sorts as is my container wagon fleet for both QR and NSWR networks.


I have found the wagon fixing points plays a big part in what container goes where. At the end of the day, we do need to match the prototype, or it will not look right. On a PCO/PCUY wagons, the containers are mounted in the centre of the wagon, the two containers butt up together in the centre of the wagon, there is no gap between them. Older under scale in length containers on this type of wagon are not going to cut it.    

SDS containers have recess slots in the container corner casting that fit straight on. The Walthers containers I cut the pin off the bottom of the container and was able to drill one (1) mm mounting holes in the corners. Other containers I used a motor tool, (Dremel) with a small engraving burr on a low speed to make slots in the corner, likewise for longer containers that protrude beyond the centre of the wagon. Slots was cut out to allow the centre twistlock to fit under the container frame. Cutting the twistlocks off the wagon floor will restrict what one does down the track. 


This SDS 40 ft container fits over the centre twistlocks without the need to make any modifications. 

I have skipped over quite a few things, there is much more that could be added. In summing up, an awesome wagon with detail that was just a pipe dream for many of us. The wagon will be at home on any layout where the modeller is wanting container trains and a must for modellers who model the mid 1980’s onwards. Well done guys, I take my hat off, an awesome model. 

They say a picture is a thousand words and I’m not much good at either, I guess the proof is in the pudding. So, I have attempted to do a YouTube video of the wagons on the layout where you can see them in action as they are put to the Westgate SWR test. 

The only issue for me is what I do with the ten I added to the layout in January 2019.

http://westgateswr.blogspot.com/2019/01/pcuy-wagons.html. I guess they will make one more trip, and that’s to the rubbish bin. More prototype information on the class is available on the site as well.    

Sunday afternoon I’m on roster to be at the Pine Rivers Model Train and Hobby Show, Cribb Rd, Brendale on the NMRA stand doing some scratch building. Be sure to drop by and have a chat. 

Happy modelling, stay safe and well to next time.

Arthur H.


Friday, 3 June 2022

More 4 Wheelers.

For some time, I have been tossing about ways to use some of the many bits I have in the cupboard, some goes back 30 odd years. Over the years the hobby has changed and much of the stuff is not available today. On other hand what’s available today is much better and the standard is much higher. 

Four-wheeler look great and a few years back they were just about on every train, but on the layout, they are not the best vehicle to shunt with. Pulling a string on a train around the layout is OK, as soon as you want to push the four wheelers go haywire taking the fun out of the session. Eight wheelers (bogie wagons) behave much better and shunting with long strings of wagons is possible. For some time, I have been playing around to see if anything can be done to improve the performance of the four wheelers on the layout. The track system is not going to change any time soon, hand-built points with a larger turnout with smaller gaps at the vee could give better results, but the whole layout would need to be changed. 

Many of my early wagons are on the light side when on the weighbridge, many had plastic wheels. All now have been fitted with metal wheels with most having bearings to improve their running with less friction. All wheels have RP 25 flanges, there is some differences in the tyre width, most are 110 with a few 88. Some extra weight has been added to some where it could be out of sight when the wagon is on the track. There are various standards around the world on what the weight of a wagon should be and there is quite a bit of difference between them all. Looking at the NMRA RP-20.1 for H0 scale the standard for a 20 ft. wagon should be 68 grams. Most of my eight wheeled wagon are not that heavy and operate OK for what I do. AMRA Freight car standard is 38.5 grams and 28 grams for Passenger car. NEM standard suggests 28 grams. Coming back to H0n3 or TT scales the weight comes down. NMRA – 51 grams, AMRA 28 grams of freight and 21 grams for passenger cars, NEM run in at 17.5 grams. TrainSpotted.com has a calculator for all three standards taking the guess work out of it. Reading US modelling magazines some modellers into operations use twice NMRA standards. That’s makes one very heavy car. 

Reading other material, they suggest free running wagons can be lighter. I guess it come back to your layout (track system/standard) and what you want to do. Is shunting of wagons a requirement, or do you like seeing trains round through the scenery on the layout. For me it’s both. To have the best of both worlds I decided to run my own tests and see what works for me on my layout.  The track system on the layout is Peco H0m (I don’t think it meets NMRA Standards), making the turnout on the points around two (2) ft radius, the main line was built with 2ft 6 in radius. Westgate yard where I pull long strings of wagons the sidings hold around 35 four-wheelers. The wagon you need for a train is also down on the other end of the siding.    

The only RTR wagons on the layout are Southern Rail ALY steel louvered wagons, the website shows the wagon is fitted with RP25-88 wheels. There is a small amount of side play in the axles between axle boxes, some side way movement within the axle box, the wheels rotate freely. I would not call the wagon a free runner, by that I mean the wagon does not roll away on a section of track with a slight grade. On the scales the wagon weights 36 grams. That’s about AMRA freight car recommended weight for a wagon of that length in H0. On the track the wagon can be anywhere on a train and it stays on the track for my type of operations.


Do you like the weathering? PK did it as a demo for the Tuesday Nighters using Tamiya “Panel Line Accent Color”. There was also a plus for him, having owned a number of these wagons for a few years, he didn’t realise the doors work, and they can be opened. Helping others always has a plus and you generally came away learning something new for yourself. 

Prior to having the ALY wagons some testing was being carried out, mainly with box/louvered wagons as extra weight can be hidden inside out of sight. Loads could be added to open wagons, for some wagons lead sheet could be added to the floor and the load built up from that. But this only works for some load types like wagons with sawn timber, sleepers, tarpaulins etc. I guess the down side is the load is fixed to the wagon and the wagon cannot be used for other traffic.


For some time, I settled on 25 grams for all four wheeled wagons, as built many were under 10 grams. During the upgrade most wagons were also fitted with Kadee # 158 couplers. That’s a long story, many were fitted with Kadee H0n3 couplers to characterise D4 draw gear of a lesser strength as per the prototype. Yes, it did work as per the prototype with longer strings, they would let go and uncouple. Most of the time not in a convenient location.   I found wagons were still going bush setting back during shunting, it was OK with small strings of wagons on straight track. 

Some experiments were carried out, mainly with box wagons where the extra weight could be hidden inside. One ABG wagon was built up to 56 grams, it tracked well, but was this adding to much weight to the axles. A second ABG wagon was 31 grams, not a lot of difference between the two wagons during push pull tests across the layout. A couple of smaller A class wagons (Prototype wheel base of 8 ft.) were built up to 42 grams, these also operated without any issues. All of these are Caintode Flats kits and are box wagons, the extra weight added inside during construction.   

Of late I have been trying to add some empty open wagons to the layout. Also, some wagons with loads where the floor is visible would be nice too. The “Grovers” bogie are available from Caintode Flats, being white metal, they provide some weight under floor. Centre of gravity plays a big part in railway operations, the lower the better. The FG body was scratch built using styrene, additional lead sheet was added under the floor to keep the loading area as per the prototype. The wagon was weighted to 28 grams, more can be added if needed. A couple of ZGR flat wagons were built from Chivers fine scale styrene underframe kits with lead sheet under the floor. These wagons came in at 31 grams and run well on the layout. Having the lead under the floor appeared to be the answer.  A Road Ragers EH Holden was added to the FG wagon bring the weight up to 46 grams. Timber chocks stop the car moving around in the wagon when on the track, the car can be removed if required.  

Adding lead to under the floor may limit the underframe detail, generally I only show what can be seen when the wagon is on the track. Most of my models are for operations on the layout, if entering contests is your game a different approach would be required. Some manufactures like to add various bits of underfloor detail making adding additional weight under the floor out of the question. 


The Road Ragers vehicles are made of metal and weight around 19 grams, vehicles manufacture from plastic etc., are much lighter. The Brekina Toyota in this wagon weights 4 grams making the wagon 33 grams. 


During the 1960s/70s, motor cars were big business for QR. Most western roads still had sections of dirt, most new cars to country agents were conveyed by rail. The driving skills of the guys loading and unloading these vehicles was something to see. Most loading/unloading was done on side banks with the door being the ramp into the wagon. If modelling an era, remember all vehicles need to fit the era.    

Having the Caintode Flats “Grovers” Bogies available other wagons can be built. This AG wagon painted grey was scratch built using their bogies. Wooden box wagons painted grey in the early/mid 1960’s were “stores” wagons. They carried stores to divisional workshops. At some stage this wagon will be decaled “Ipswich – Toowoomba Loco Stores”. The wagon will carry loco parts between Ipswich Workshops and Toowoomba and onto other SWD locations as required. 


The next batch of smaller four-wheelers I use Peco TT underframes. To make them look more QR, the underframes were cut in half and mounted back to front placing the brake blocks out. The frames are quite thick and need to mounted on a floor higher than prototype. Additional weight can only be added inside.   


The extra weight was added inside the tank, both these water wagons are 35 grams each.


These wagons are shorter than the usual FGW wagons, but due to the higher tank they had a higher capacity. Plans suggest only five were built, I recall one being use on the Rockhampton – Mackay local goods/shunt to water gangs. Queensland Railway Miniatures and Caintode Flats parts were used to detail the models. 

Open wagons using these underframes will need to have loads.


Most of these wagons can be viewed on trains at work on the layout in my latest YouTube attempt.  

Guard Vans are back on the workshop bench for the next posting. 

Trust, you find the information helpful and assist you with your railway. 

Arthur.