Friday, 22 March 2019

What’s on our Trains?

There is various methods to check out your latest master piece or what you are doing on the layout. One of the best methods is to photograph it. You would be surprised at what you see looking at your models/operations on the computer screen.
Most of my wagons have loads and for some time I have been doing presentations at conventions on loads carried on our rail networks. Reviewing the video on “Train spotting at Wyandra” https://youtu.be/PvB30g4tFRI I noted I was not following my own advice in the presentation. !!!!!
 
In the video there were two QR trains that crossed at Wyandra, one train travelling west (an Up train) crossed a train travelling east (a Down Train). On our layouts that is one train coming from our left and the other coming from our right. Both my trains had much the same loading. Both trains were conveying motor vehicles of the same era, and box wagons with doors open.  If they were two coal trains, one would be loaded and the other empty. It’s much the same for freight / goods trains. Trains travelling away from the capital or major coastal cities convey loading for country towns and isolated sidings. The freight on these trains is goods to keep these communities going, food stuffs, milk, building materials, machinery, new cars, trucks and tractors, fuel etc. Trains coming back have the same wagons but would have different loading. Here is Queensland in the sixties the largest product would have been wool.


The train travelling west has all wagons conveying freight, the other train travelling east has a number of empty wagons.  

Yes, some wagons look the same loaded or empty, fuel tankers, grain wagons, box wagons to a point, and stock wagons. Most of these travel empty one way and loaded the other way. Fuel tankers and box wagons go out loaded and return empty. Grain and stock wagons go out empty and return loaded.  


 Empty box wagons coning back from country areas may have their doors open regardless of instructions to keep them shut.


The big difference is open and platform wagons, going out a wagon could have a load of timber, on the return the wagon could be loaded with wool or be empty if not required to fill orders. Some loads in open wagons going out do come back, I.e. drums. Small quantities of some fuel products (kero, Av-gas etc.) and oils are conveyed in 44 gal/200 litre drums. Going out loaded these drums are loaded upright. When empty the drums are returned to the sender. There is no hard and fast rules for returned empty drums. The object of the excise is to load as many as possible into one wagon. This is subject to the height of the wagon sides. If an item of freight is six inches below the top of the doors, no securing is required. If the drums are stacked higher above the sides, a rope over the top was in order. If it was not done, the shunters took great delight in seeing how many drum they could flip off the top. Prior to the early 1990’s, loose shunting was the order of the day. Wagons without air were kicked by the shunt engine and allowed to roll freely down a siding until coming in contact with the first wagon, the size of the “BANG” was subject to the speed the wagon obtained before meeting that wagon. All of this was subject to hot or cold bearings, roller bearings, weight in the wagon and the grade. I recall seeing an ALY (roller bearing) wagon rebound four times off that first wagon before stopping.    


All loads travelling West.
Below are loads travelling East.


For wool there is loading diagrams showing how to get the maximin number of bales into a wagon. All loads don’t need to be full loads. You may find loading methodology may change over time. Wool is one example when the bale material changed to a polly material. Some western stations had set orders for wool. Charleville wagon orders showed equal to 20 F of flats for the wool ramp each day. Within QR open wagons were called flats, one “F” was equal to 15 feet, that is one four wheeled “F” wagon, one eight wheeled “H” wagon was equal to 2F. Red circle (express freight, 50 MPH/80 Km/h) HJSF, HJST, HSA were referred to as red spot H’s. The order would have a mixture of both four and eight wheeled wagons.


Empty Wagons

Tarpaulins used on loads going out are should not to be left on the floor of an empty open wagon. Tarps not required for retuning loading (wool) were folded and sent back on passenger trains or in box wagons. Many open wagons returning from country locations came back empty. Often dunnage (timber/tyres/pallets etc) used to secure a load arriving at the station was left on the wagon floor after unloading. About every two months a Traffic Inspector would arrive at your station unannounced to carry out a station inspection. This inspection was written up in the Station Inspection book. The Station Master would action all unsatisfactory items before sending the original copy to the General Manager. The inspection covered all aspects of station work, accounting, safe working, and general condition of the place. To keep station yard clean and tidy, station staff would toss rubbish into empty open wagons.   


 Water Wagons. 

The Working Time Table allocates trains and days water wagons are to be conveyed on trains. Trains carrying out watering duties, the water wagons are on the lead behind the locomotive. Water wagons returning to depot stations are marshal within the train. I think a lot more could be said on this subject, maybe another blog page down the track.   
 

Car Wagons.

From the early 1960’s, car were conveyed on platform wagons set up to transport wheeled vehicles, SMS (wagons 30 feet long and shorter) and SML (wagons over 30 feet). Later on this classification changed as various different size wagons were added to the fleet. Open wagons were used also. These wagons on trains travelling to country locations carry new cars, trucks, tractors, caravans, farm machinery etc to country dealers for sale. Country trade in for new cars were often sort after in the city due to less rust in their metal body. On the return journey the wagons mostly went back empty, from time to time they may of carry an earlier model vehicle. Plus an odd caravan or machinery item requiring repairs could be returned on the wagons.     


 Road Wagons

If we have a look at goods trains back in the 1960’s /70’s, you will find most goods trains had a number of box wagons marshalled on the guard’s van. Some trains also had an ice wagon or two in this consist loaded with fruit and milk. Road wagons carried small quantiles of goods for various stations on the line. This goods was unloaded by station staff and or the Guard. Goods item for station further down the line was also loaded into these wagons. Small items for isolated stations/siding would be placed in the van with the Guard.   


Camp Wagons

Each division had a pool of trade/skilled workers, most were required to move around their area of the division, often in remote locations. Most had a home station within the division. These employees did so in camp wagons. Prior to early 1970’s, camp wagons were very basic, mainly converted box wagons, if you were lucky you may have scored a converted carriage. For this blog I’m looking at there place on a train. On a shunt train they would be marshalled within their destination block. On through trains with workers travelling in their camp wagons, the camp wagons were marshalled towards the rear of the train near the guards van subject to roads wagons. They would move back and forward across they area of responsibility.  More about this group of workers can be found in my blog “Paper, Paper” November 2018.           


In my latest video “Train spotting at Westgate Branch Points” https://youtu.be/zbPD3j3QDVA has the trains coming and going reflexing prototype operations more correctly.  

Thursday, 14 March 2019

PE Wagons


Wagons on Train 209/309 continue from November 2018 blog http://westgateswr.blogspot.com/2018/11/train-209309.html

After the introduction of the MTW’s, the next Platform Wagon to enter service on Queensland Railways was the PX wagon in October/November 1959, built by Commonwealth Engineering at a cost of $5,522.91 per wagon. The classification code was changed in 1964 to “PE” following the introduction of the ROA interstate coding system. “P” was 8 wheeled Platform Wagon and “X” was being used for 12 ton axle load. In the new ROA code, “X” was for wagons suitable for bogie exchange. “E” replaced the “X” as the second letter for the 12 ton axle load (4 x 12 = 48 t gross). Running Numbers 31609 to 31618 were allocated to the class.

 
Partington 06 July 1999.


The wagon tare was 12.8 t and could carry 27.8 t on all lines and 36 t on “A” class lines. Dimensions, Imperial: 32’ long by 9’ wide. Metric: 9750 long by 2740 wide. The wagons could carry a symmetrical load, but unlike the QFX/QFC wagons, its full load is not intended to be supported in the headstock area. The smart looking wagon was fitted with QR 11 three piece cast steel bogies with spoke wheels (5’6” axle centres with 33½” wheels). The drawhooks were fitted with fixed screw coupling, thus a hook was provide under the headstock to carry the coupling then not in use. This type of couple came standard on other rollingstock for a few years, WHE’s, 1460 class DEL’s to name a couple. These coupling were very heavy and stiff without side movement, thus not very popular with shunters, in time most kind of came off.  The drawgear was rated as D2 or Premium in the old language. Later, (likely 1969) the wagons were fitted with red circles for express freight operations as 80 Km/h runners. Around the mid 80’s the wagons were fitted with container securing equipment and could carry a standard 20’ ISO container in the centre of the wagon and fitted with auto coupling, spoke wheels were replaced with disc along the way. The single slot wagons were used on Branch lines, containers where often stuffed/loaded across the wagon floor.  The truss rods were welded angle steel type arrangement.  Another feature of the wagon was the headstock hand brake wheel on one end, this was just “Micky Mouse” when shunting at Roma Street.

 
I guess I better explain shunting Roma Street, it was a gravity yard, all downhill just like Countess Street. After a train arrived at Roma Street all the Westinghouse air was bleed from the wagons. The shunt engine (PB in steam era or a DH after about 68) would hook on the pull the train up into Normanby. The Shunter in Charge would control the move using a set of traffic lights hanging under College Road bridge. There was 2 sets of lights, one for the North Yard (Roads 1 to 16, these were on the Park Land side of the yard) and the second for the South Yard. Red light was stop, Green light to go forward and a Yellow light to come back. The shunt engine would push the train back into the yard with the Shunter in Charge cutting off wagons for the various roads. There was a hand sign for day and a light sign by night for all roads. After the wagons were cut off, the Shunter in Charge would give a sign to the Shunter to which road the wagons were to be placed, by this time the wagons were rolling freely. The Shunter would change the points and ride the wagon operating the hand brake, sometimes you could have 6 or 7 wagons in the sting, hopping off and on to apply or release brakes. Didn’t take long to become a fit little digger I can tell you. The older wooden wagons with lever brakes were a lot of fun, the lever is only on one side. Sometime the Shunter in Charge would check them before letting them loose, if the lever dropped to the bottom he would stop the move, crawl under the wagon and place a dog spike in the hand brake chain. 

 
Back to PE wagons, it was like winning the casket if you got a PE, you would set the road and jump up on the floor, sit on the floor with your legs hanging over the headstock, apply/releasing the brake just like a ship’s captain, being roller bearing it didn’t take much time before you had the wind blowing through your hair. One afternoon I was taking one down 24 Road to place under the gantry, I think 24 Road was the longest road in Roma Street, the gantry crane was next to Platform 8, about were platform 9 is today. As I turn the corner I could see there were a couple of wagons on the stop blocks, Platform 8 was packed with passengers waiting for their train. They didn’t look to very happy and appeared half a sleep, so I decide I would wake them up and bring them into life. I release the brake, jumped off let it go, and found a place to hide so I could watch proceeding, a few seconds later the PE slammed into the other wagons, lots of noise and dust everywhere. The PE bounced into the air along with all the waiting passengers on Platform 8. Lucky for me the wagon stay on the track, I turned and walk back up towards College Road bridge for my next wagon/s. You can see why I pulled the pin, no more fun in the job anymore?????   This method of shunting is still in the Shunter’s Manual and is called “Controlled Shunting”, you need authority to do it. I think I may have been the last to have that authority. . The PE wagons were withdraw from service in 2000.
 
General Appendix 1962 clause 62;  Wagons for Heavy Machinery. 10 PX wagons to carry 35 tons 8 cwt have been allotted, 6 to SE Division, 2 to Rockhampton, and 2 to Townsville. They are available for conveyance of heavy machinery or heavy loading. This class of wagon must not be used without the author of the relevant General Manager. Their travel with a gross weight of over 40 tons shall be restricted to those sections available for B 18 ¼ or heavier steam locomotives. However, provided the gross weight does not exceed 40 tons, i.e. with a maximum nett load of 27 tons 8 cwt, PX wagons may travel on all lines available for steam locomotives.
 

Back to 309/209 on Westgate, the train has 2 “PE” class wagons in the consist conveying farm machinery. Some time ago, I purchased two GHQ farm equipment kits. # 60-0 13 Hay Baler and a # 60-006 1940’s Green 12 A Harvester. Austral Modelcraft has some GHQ kits. The biggest concerns I had was the overall width of the plant.  The harvester was going to stretch the limits, the widest platform wagon on the QR network is a QFX/QFC which is 9’ 4” across the floor. On completing the harvester kit the overall width across the wheels came in as 10’ 6’’ (bugger). I did consider adding a wider floor using crossing timbers across the top of the wagon floor, 10’ 6” was OK for a wide “Out of Gauge” load, but in jacking up the floor I was going to be to high. The grain elevator would arrived at it destination in a different shape, I don’t think the customer would be to happy. It was common practice to load caravan on their axles without wheels to reduce the height. Removing the wheels the harvester came in at 9’ 3” wide.  I did not have a QFX and didn’t feel like building one, so I decided to build at PE making the floor 9’ 3” wide (3” modellers licence, if I didn’t tell you, you wouldn’t pick it). The wagon was built from evergreen styrene and fitted with Southern Rail bogies. Most QR manufactures have bogies that could be used. The coupling are Kadee whisker scale head type # 158. I make my own couple boxes as part of the floor which allows for the buffers and give plenty of clearance around the wheels. The harvester was placed on old sleepers and chained to the wagon, some old sleepers were also used to stop any movement along the wagon. The old sleepers are match stick painted, the pine chock are the same cut with on an angle and left unpainted. 

 Scratch build PE

The Hay Baler was loaded onto a 3’ 6” Models PE wagon, the wagon has been on the layout for some time conveying a tractor with a slasher attached, not the best use of a PE wagon. The bogies are Steam Era XSC bogies cut back (At the time I was able to buy bogies without wheels) and regauged with K & S brass rectangle tube # 8262 (3/32 x 3/16) cut to 15.5 mm long, Steam Era spoke wheels were added making a very free running wagon. The couplings are Kadee H0n3 # 711/714. The method in my madness at the time was to use these couplings on hook wagons which should be marshalled towards the rear of the train. If I didn’t marshal them correctly, the same thing would happen as the prototype. ???  A good one hey. They don’t work the best, plus I want to run trains, not repair wagons, thus over the past few years have changed to using whisker couplings. I has since changed then over using a the Kadee # 262 narrow boxes with a # 158 scale whisker coupler,  mainly buy the bulk packs without boxes.    


3' 6" PE Kit. 
 
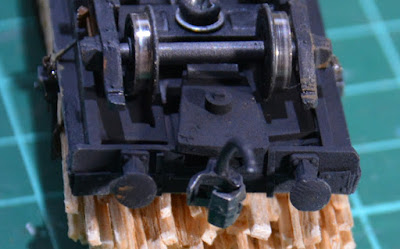
Steam Era bogies modified for 12mm tracks with # 711 Couplers.
 

Both wagons were weathered using Doctors Ben weathering powers applied with Isocol (rubbing alcohol available from the supermarket).    


I was talking to Peter Kennedy who was Manager of Special Loads in QR for many years. Here is some of what Peter had to say about modifications to PE wagons to carry special loads. You may recall I modified one for the harvester load.

 In their early days I had some control of PE wagons which didn't count for much after QFC wagons were introduced. However in the early 1960s QR was asked by the Army to transport Centurion tanks (52 ton stripped for transport) from Clapham to Gympie for Tin Can Bay. PE Wagons were unsuitable as is, but I never gave up easily. I asked the CME design staff could PE wagons be strengthened to carry these 11ft 6 ins wide and 52 tons tanks. The answer was yes with considerable strengthing of the underframes, increasing the floor timbers to 2 1/2 inches thick and 9ft 4 wide. The extended timbers to be further supported by a heavy angle steel welded on the outside of the solebar. It would be necessary to change the 12TAL bogies by 15 ton axle load bogies. I arranged this by using new 15 ton axle load bogies being built for the new WHO wagons for the Mt Isa line.​

The next issue was bridge loading. The loaded modified PE would be just over 16 TAL but also considerably exceeded the linear limit of 1.5 ton /ft. After lengthy consideration the Bridge Engineer approved the movement with restrictions including each loaded PE must have an empty wagon before and after over certain bridges.  It was all in vein as the transport dept. would not allow the army tank transporters over the road bridges between Gympie and Tin Can Bay.  The Army took the tanks by sea on LSM barges to the Bay. 

Some months later the Army approached QR, this time they wanted to take 4 Centurions from Tin Can Bay to the Army tropical trials near Innisfail. They would take them to Lucinda by an LSM and hoped to road transport them to their tropical trials unit. But!! the transport dept. refused to let their loaded army tank transporters over the Herbert River Bridge. Could QR carry them the short distance from Ingham over the river and then unload them at the next suitable unloading station, the name of which I cannot remember.  QR agreed to do it, but to modify only one wagon PE31612 and conduct a shuttle between the two stations. A  B18 ¼ did the 4 shuttles and was supervised by Harvey Bamford from my section.  I cannot recall if the tanks were ever returned by this method but PE31612 remained in the modified condition for the rest of its life. Whether its original bogies were returned I am unaware but this movement brought home to QR the serious need for a much heavier flat wagon and I was privileged to work in conjunction with the CMEs design staff the outcome was the QFX/C wagon.  Originally, I asked for 10 QFX wagons, they were so popular QR built several hundred of them.  Hope this added a bit more to Arthur’s great story.  


 PE Ipswich, Auto Couplers, Container spigots, disc wheels, painted grey.  

Friday, 8 March 2019

Kadee Couplings on Narrow Gauged Wagons.

Fitting coupling to a narrow gauged H0 scale wagons can be a lot of fun. Modelling a 3’ 6” gauge system on 12 mm track does not leave a lot of room between the wheels to fit couplings.

 Looking at the prototype and comparing the differences between NSWR standard gauge couplings and QGR narrow gauges couplings there is very little for the modeller. The height above the rail being the main difference.

QR coupling on yellow wagon coupled to NSW standard gauge wagon

 
In the 1960’s, Queensland Railways had four drawgear classifications on their rollingstock fleet. Auto (D1), Premium (D2) hooks on the steel rollingstock built in the 60’s, Select (D3) hooks on steel wagons built in the 50’s and newer wooden wagons, and ordinary (D4) hooks on the older wagons and all four wheeled wagons. By the early 1990’s it was all auto (D 1) couplings and the buffers were gone. The era I model had all classes including transition coupling to couple hooks with auto couplings.


At first on my wagon fleet I tried to have different class/standards of couplings as the prototype, the method in my madness was to marshal trains as per QR instructions. Stronger drawgear to the front and not so strong on the rear, maybe have the same end results as the prototype if the instructions were not followed.

 So all wagons could operate together on the layout without to much trouble, I fitted Kadee # 711 H0n3 couplings on the hook wagons and Kadee # 5 coupling to more modern steel wagons fitted with auto couplings. This worked OK for trains running around the layout. The # 711 looked good set between the buffers. The # 5 looked a bit big, but they were the same size as standard gauge wagons on the layout. The standard Kadee # 5 box (# 242) left little room between the wheels on the QR rollingstock, some wagons had wheels on the end of the wagon. This left very little room for the bogies to turn. Not being a fan for gluing couplings, as much a possible I would use a screw to fix the coupling. Open and platform wagons made thing a little difficult and some time there was no choice. I often fitted the # 5 coupling without the box, screwing the coupling and the brass spring to the wagon floor.


 I was not over concerned if the couplings did not centre, the prototype do not centre, it’s up to the Shunter to line up the couplings. Most did not have grease on the slide plate and often required two hands a lot of grunt. The height also varied considerably, loaded wagons with empty wagons, new wheels with last turning could alter the height quite a bit. Provided the jaw hit the knuckle tongue on the other coupling and the coupling locked, all was good. 1620 DEL’s were noted for their low coupling, often you would stop short and close one jaw. Some times it was a two man job, one shunter would lift the coupling and the other would slide a dog spike under the stem.  The good book suggests after coupling auto coupling they should be tested by stretching them, the locking block in bottom pin couplers often did not drop.

 
All was good on the layout until I started making up operations sessions requiring a number of shunting moves. In big strings of wagons the # 711 did not like being pulled and pushed about and would let go. Often in hard to reach locations, plus it added extra time into the shunt. Maybe I had given them a flogging over the years. Yes, the method in my madness was working to good. The scale whisker coupling have been out for some time and are great, they are better than sliced bread. I use the # 153 short centerset on wagons without buffer. # 158 medium centerset subject to buffer size and # 156 long centerset for bigger buffers. In each application, I use the shortest shank coupling for the job. When pushing back, the long shank couplings swing to one side and on curves could cause wagons to derail. I have been using them on all my new rollingstock and they work great and look awesome. I have found them easy to fit. Over the last few years I have change my fixing methods a bit. On open wagons without a load and platform wagons I make the coupling box as part of the floor.


At first I was using styrene for all of the compounds including the coupler pivot. Thinking that this may wear over time the next lot of wagons I included a brass bush made from 1/8” brass tube. The last lot I made I used a 1/8” brass rod (3.1 mm) in which I drilled a 1 mm hole in the centre using the lathe. The rod was cut down to the same thickness as the coupler shaft. A 1 mm brass rod was used to mount the pivot block. This was done on the PCUY wagons which you can find on the blog.  http://westgateswr.blogspot.com/2019/01/pcuy-wagons.html


Recently I made some grain wagons, the wagons were fitted with traps and the floor was not visible. I fixed the couplings with a self-tapping screw, much the same size as the coupling pivot hole. A washer was added to provide extra support for the bottom of the coupling. Check the size, it may foul the wheels if to close. With styrene made wagons the self-tapping screws can form a bubble around the fixing hole, this will need to be removed with a file. The mounting hole can be some what large also.


I have used a 3mm machine screw with much same the success. It was OK, but I think better method could be found.


Sometimes the Kadee # 262 narrow snap-together insulated coupler box was used and worked well. The box is ¼” wide giving you some room for the bogies to turn. Auto couplers on some freight wagons has a flange/yoke protruding out from the headstock. The box came come out from the headstock a litter can give this effect.   


This coupling is to far out from the headstock, I was using the fixing point from a previous coupling.  

 On changing the # 711 to scale whisker couplings I used a 2 mm machine screw with a 1/8” brass collar in the same fixing hole used for the 711. The hole was drilled out with 1.5 mm drill and thread added with a 2 mm tap. The brass collar was made from 1/8” brass tube cut to the same size as the coupling shank. A washer was added for extra support. The treaded screw provides fine adjustment to allow free movement and to keep the shank straight without sagging. Most wagons were box wagons or open wagons with a load. A couple of open with vehicle loads I covered the screw with some rubbish. Often dunnage from a previous load was left in the wagon. If you took it out of the wagon, you created another job for yourself, what to do with the rubbish. Laptop screws with a fixed washer is being considered for the next batch. I see them on e-bay in the modeller’s favourite colour, black.


711 Coupling
 
 
Using a 2 mm screw

All my four wheeled hopper wagons are Peco TT underframes, these were available in the seventies. At first I ran them in blocks of five using dummy knuckles. A small Kadee rounded box was used at the end of each block, this didn’t look all that great and did not work all that good. Moving into operations I wanted to be able to change the orders for each day, to do this working couplings were required on all wagons. After some thinking, a channel was cut into the headstock with a dermal cutter to take the coupling shank. Short shank couplings # 153 was used with a brass plate top and bottom to hold the underframe together and to mount the coupling. Fixing the coupling was the same as above with the 2 mm screw and a bass 1/8” bush. Yes, a little bit of a compromise, once painted they don’t look to bad and they fit the bill until something better comes along.  


The QR coupler height is 2’ 8 “(9.3 mm for the modeller), for mounting I use the casting mould line in the centre of the knuckle for this measurement. I made a coupler gauge to ensure all wagons have the same height coupling. The coupler release pin is raised a little to ensure it don’t catch on points. So buffer do not buffer lock on curves and points I try to mount the back of the coupler pocket in line with the front of the buffer. I use Peco track and standard points with a 24 inch radius on the turn out. The curve points have an 18 inch radius turnout. Placement of the coupler should be checked if running on less than 24 inch radius curves. This may not look prototypical with a large gap between wagons, our models run on much small radius curves than our rail networks use and do not have springs in the buffers. The modern era without buffer it is more achievable, but the slack in model couplings is greater than the prototype draft box. On the prototype, a train of 40 wagons will have equal to one wagon of slack across the draft packs.    

 Standard HO gauge on top, H0n42 gauge on the bottom

Trust you find this helpful in your modelling.