Thursday, 22 March 2018

Shunting


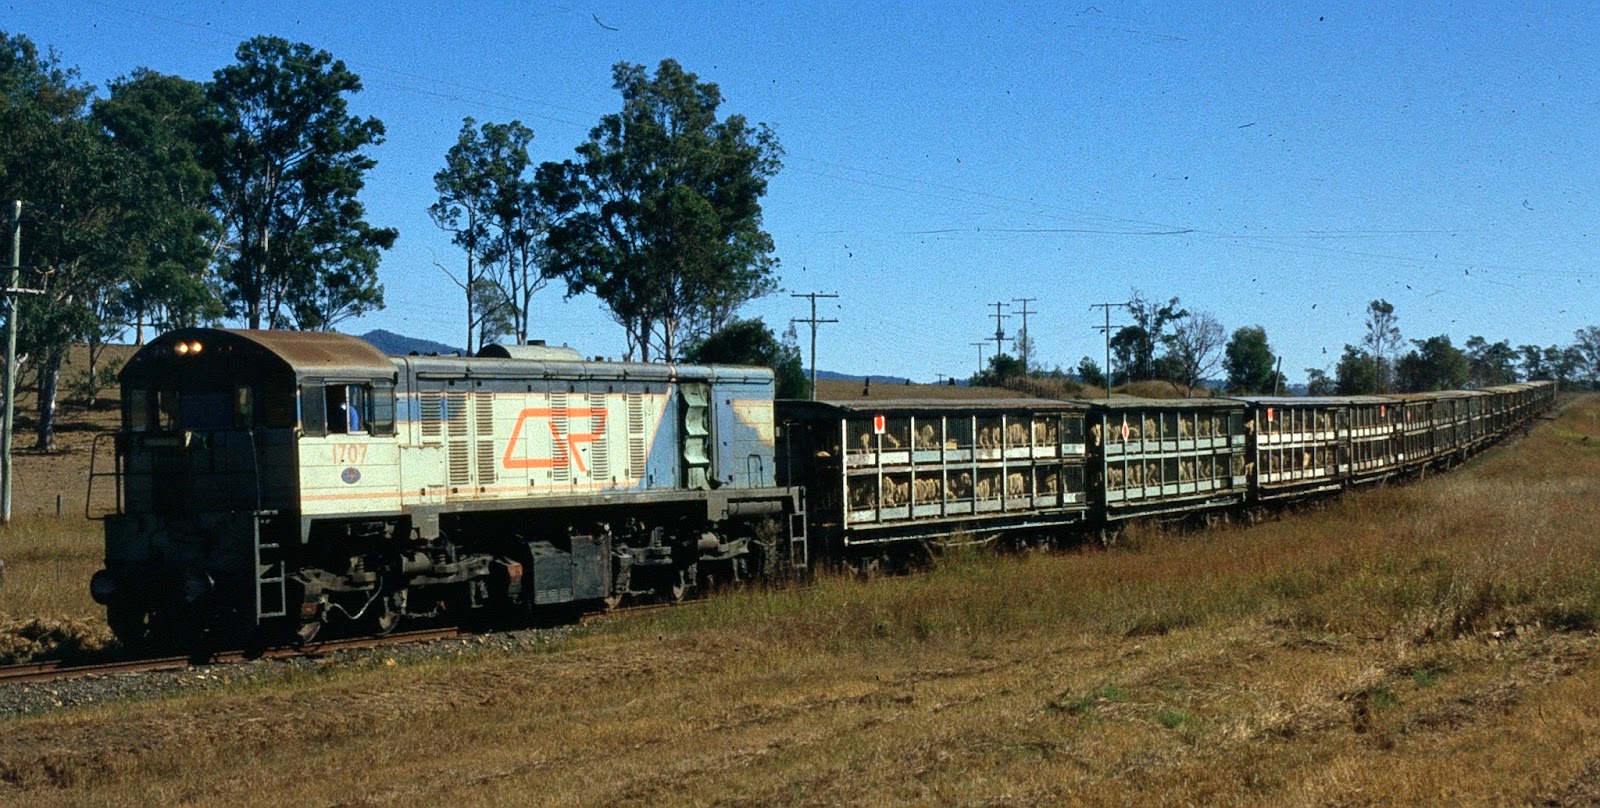
Fly shunting and loose shunting was the “NORM” until the mid-1980 on the QGR...

On the arrival of a train at a station the train engine would head for the shed and a shunt engine would break up the train. The shunters would bleed the air from all the wagons leaving the hand brake as the only working brake, that is, if it was working. Most yards had a section of track on a slight grade, some western locations it was the main line into the station.  Most trains arriving at depots stations were not marshalled. For example, a train arriving at Charleville could have Quilpie loading in 4 places, Cunnamulla loading in 3 places, Charleville in 5 places, plus there could be Wyandra, Cheepie and other loading through the train for smaller stations down the track.  

To break up the train the shunters would pull the train up to a suitable location and come back kicking wagons down various roads to bring the loading together for other trains and the yard. The shunter would cut the wagons off and they would roll down the set road until they hit the first wagon in the road. Sometimes a shunter may apply the hand brake if they need to pick up the wagon again. If you are thinking this a sure fast way to damage freight and wagons you are on the right track. Wagons coming in on a train rolled better than wagons sitting in the yard, one has hot bearings as to the other cold bearings. Roller Bearing wagons put a new spin on things, they would run away just sitting in the yard without a hand brake on. When loose shunting roller bearing wagons they would pick up speed quickly, often slamming into other wagons that had gone before them. They would rebound and come back towards you until they stopped and then roll back onto the other wagons, at times this would happen several time before the wagon stopped with the other wagons.    

Roma Street was a gravity yard, all wagons were kicked from Normanby end, some of them ran all the way to 24 Road beside the old platform 8. I recall taking a PE wagon down to the 24 Road one afternoon in peal hour, platform 8 was packed with passengers. The hand brake on PE wagons was on the headstock, so you would sit on the deck with your legs hanging over the headstock and turn the hand brake wheel. Once on the wagon you would take the slack out of the mechanism and test the brake, you would it in a position so a couple of turns and the brakes were on. This day I came down, turn the corner into the loading area heading for the overhead crane riding the wagon like being on a surf board. The passengers didn’t look to happy after a day’s work at the office, so I decided I would change that. I gave the hank brake wheel a couple of turns and left the wagon. At great knots the PE wagon slammed into the first wagon sounding like a bomb had gone off. Me, now hiding behind a wagon in 23 road with a view of 24 road I could tell the passengers on 8 platform were all awake with many going into the air. It was great walking back up the yard to pick up the next wagon/s, as I made so many people happy on their way home. There was sauce and beer running out of wagons just about every day. The door on 7 shed got knocked off there hinges about once a week. Every road had a name and a hand signal for day and light signal for night. The Shunter in Charge would cut the wagon/s off and give a signal, the shunting waiting 100 yards down the track would set the road and jump on as the wagon/s as they rolled by. He would test the hand brake to see if it works, if it didn’t he would jump off and wait for the next wagon that had a brake on his side. Timber wagons only had a hand brake on one side. Yes, all good fun. 

As in the HWO review, fly shunting was getting wagons on the front of the engine to behind the engine without running around. This photo by Ted Ward shows a shunter in action. I bet you like the safety gear.   

The white circle chalk mark above the axle box indicates the wheel flanges are getting sharp. No computers them days, but the word still got about.
 

Ken was over on Sunday and took a few movies with his phone.

https://youtu.be/7cF0Ss_3wHM  


I think there is a few more on Facebook with loose shunting as well.


Controlled shunting is still allowed by approval of management, but cannot think of any location where it is done today. Controlled shunting is much the same as loose shunting without the engine kicking wagons off. Controlled shunting is allowing a wagon to roll freely using the hand brake to control the move. Pinkenba grain terminal used this method to unload grain wagons. The wagons were dropped down onto the tippler for unloading and then dropped out of the shed. Many of the grain loading facilities on the Downs could do this to load wagons.

Until next time, enjoy.

Arthur.  

Thursday, 8 March 2018

Loads


LOADS.

As indicated previously, various loads were carried in HWO/HWOS wagons.  Steels loads are easy to make.


In this wagon the steel sheet is styrene sheet cut to size and painted with gun metal. Pigments were used to add some rust.


The steel rod bundles were made from Evergreen styrene rod. Most are .040”, one bundle of .035”. A few bundles of angle were also done to make a mixed load. All were painted gum metal, pigments were used to add some rust. Dunnage used to separate bundles of steel is 4” x 4” hardwood. I used 4“ x 4” Evergreen styrene cut to size, about 4’ long and painted brown.  Most steel wagons had loose dunnage laying around on the floor and old car/truck tyres. The tyres in these loads are off my old Matchbox cars I had as a kid. The axle/hub centres were drilled out with my cordless drill. They were painted black mounted on a skewer.  

In the Sep - Oct 2016 issue of MainLine,  Rod Tonkin has an article on “Building Material Size”, this gives a run down on steel sizes and lengths.     http://nmra.org.au/mainline/index2015.html
Auscision Models have suitable loads for Open Wagons for about $ 20.00 per single wagon. These include “H” Frame (New or Rusty). Wire, Pipes (Silver, Yellow, Black), and Telegraph Poles.
Evergreen Scale Models offer a verity of structural shapes in channels, “H”– Columns, “I” – Beams, Angles, Round Rod, Round Tubing, Square/Rectangular Tubing and strips. Most hobbies have a stand with the various sizes in each type. Cost can vary from store to store somewhere between $ 7.00 to $ 10.00 a packet.  
 

This wagon is loaded with Roof top vents made by Rix Products Stock # 628-0610.


This wagon has a load of concrete pipes, Evergreen # 234 - 7/16” Tube was cut to length using a razer saw and a mitre box. They were painted concrete and added to the wagon. One packet will give you a load for one wagon with most of the second tube in the packet left over. This could be used with tube of a different size for a mixed load. Note the tyres at each end to stop longitudinally movement during travel.

All these loads can be easily removed and can be exchanged.    

Loads covered by Tarpaulins.

The loads were made from styrene sheet and off cuts.


The 1982/1989 General Appendix shows general freight traps are 6 700mm x 5 200mm.                     


I made a template from styrene sheet to make it easy. I make most of my general freight tarpaulins from Lipton tea bags. After making a cup of tea, I wash the bags out in the sink. The tea bag is placed outside in the sun to dry out. Once dry the staple at the top is removed, open the seam with care and remove the tea. Using the template I cut two tarps out. I was using a fine black felt pen and cut around the line. However the black line is hard to hind during painting. Lately I just cut around the template. The centre is marked on the traps in a couple of places in pencil. I also mark a centre line on the load so the trap has equal overhang on both sides.  

The trap is placed over the load and tacked into place with a drop or two of super glue. I let is dry before attaching the trap to the sides with super glue. Using a tea bag the super glue will soak through paper onto the styrene load. I use super glue as some of the other types of glue will distort the styrene over time. Allow the super glue to dry before folding the corners into place. The ears should be folded back across the wagon ends, but you will find some that were folded back along the sides, this was much easier than across the couplings if you were on your own. I won’t talk about a windy day, I’m sure you can understand the fun we had. If there is more than one tarp covering a load, consider must be given into the wagons direction of travel. Over laps should not be allow to balloon up during travel. The leading tarp should go over the top of the tarp behind it, In other words the rear trap goes on first and work towards the leading end of the wagon. Contractor with mix loads would place the traps to suit the various heights of the load to stop water entering, if the overlap was the wrong way around, ropes over the tarps near the overlap would be used to stop ballooning.


These tarps were painted with Vallejo acrylic paint # 70.915 deep yellow. This is the first time I have used this paint for traps. The colour didn’t cover the black felt pen marking. A light grey was used to paint out the lines, then covered with the yellow, a few coats were required. In some cases, the black line on the covered trap is still showing. The stain in the tea bag add a nice weather effect.

Tarps are secured to wagons with rope called ratline. I think they are more trouble than they are worth on a working layout. After a short period of handling they all come off, so I left then off. On the Modelling the Railways of Queensland Convention website in downloads there is a copy of my presentation on tarpaulins from the 2012 Convention http://qldrailheritage.com/mrqc/downloads.html. The presentation covers various materials used to make tarps and other references.


This wagon is a load of empty stubbies, two pallets high. ARHS Sunshine Express reported HWO’s 39546 and 39544 conveyed empty stubbies from Roma Street to C.U.B Cairns on the 14th April 1979. 

 As an experiment I have added trap numbers. A few moons back, a colleague by the name of Mr. Ken Edge-Williams made some home printed decals for my WH grain wagons. The decals have not made it to the grain wagon yet. Thus, the number are for the mid-sixties and not the correct for the era. From 18” the number are not visibly anyway.  Vallejo # 70.510 gloss varnish was apply to the traps, when dry the decals were added. After the decal set another coat of gloss was applied over the decals.  To finish off the painting, the traps were given a coat of Mr Hobby water based acrylic flat clear H 20. I would normally stick with the same brand of paint, but the Vallejo Flat clear had been sold out. One tarp on both wagons were given a wash of dirt using Fatigue Green pigments. Just a bit of fun to see how it looks, I let you judge if I have made a rod for my back.    


 This wagon had a coat of Vallejo # 70.522 satin varnish applied to the tarp to give a PVC look. The wagon is modelled on a Hiles contract wagon with a mixed load for Warwick. More on the contract train 6678 will be in the next blog. A few more loads are needed to complete the train.  

The wagons were lightly weathered using an airbrush with Vallejo Model Air # 71.133 Dirt, Game Air # 72.762 and AK 723 Dust.


The HWOS was weathered using Doctor Bar’s Scale Consortium Industrial Weathering Pigments. I have had these for a number of years and purchased them from Rails in Scale at a Sydney Exhibition. The following colours were used Brownstone, Dry Fresh Rust, Light Rust and Fatigue Green. The Pigments were applied with a wet (water) brush and allowed to dry. A dry stiff brush was used to remove excess pigments. Areas around the doors was added by dabbing pigment with a fine wet brush and let to dry.   

 
Trust you enjoy, please yell out if you have any questions.     
Arthur Hayes.


Tuesday, 27 February 2018

Sunshine BL Carriage.


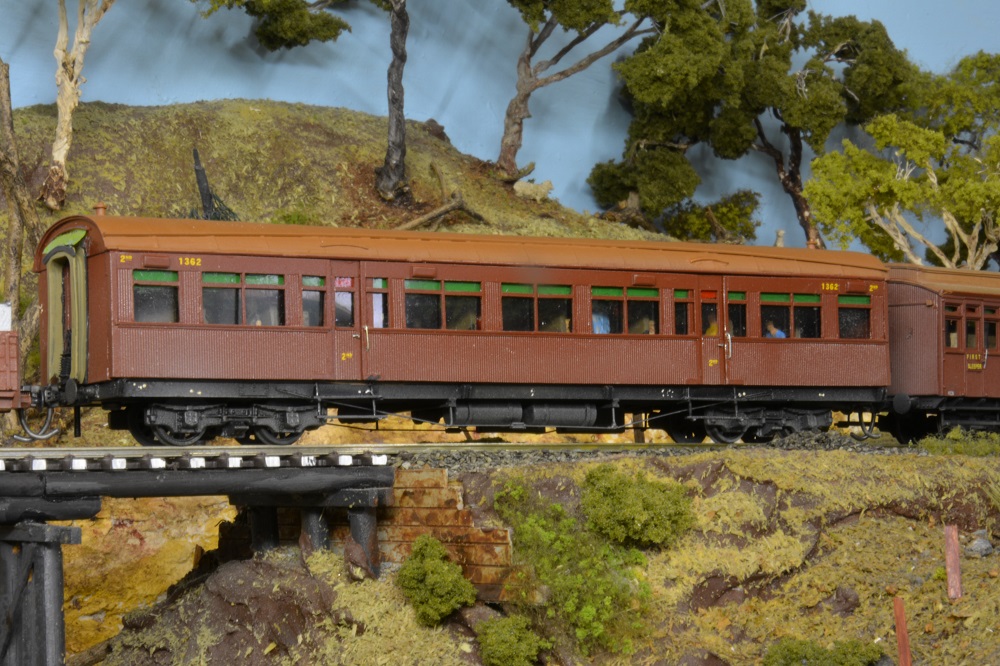
Over Christmas I was able to finish off a Sunshine BL (Second Class Sitting Car with Lavatory) Car.

The model is a Three Foot Six Model running on Caintode Flats bogies.  The bogies should have  rolling bearings to be 100 % correct.  

Yesterday I finished the model with a light weathering using Vallejo Model Air 71.133 Dirt, Earth &2.762 and AK 723 Dust.  Mainly I wanted to highlight the detail (water tanks, battery boxes) under the carriage.


Before weathering


Light weathering.

Friday, 23 February 2018

HWO Wagons


This week CGL Models (www.cglmodels.com.au) HWO wagons arrived in the mail. The wagons come in a pack of three, with four different packs for you to choose from. Pack 1, general traffic wagons (1980’s), Pack 2, one general traffic, one Q-Link, one QRX (1990’s), Pack 3 is three HWOS steel wagons (2000’s), Pack 4 is one general traffic, one QRX and one HWOS (2000’s). The prototype wagons entered service in 1974, in the mid 80’s the class was modified by placing the inside stanchions outside to give a uniform loading area between the doors. The wagon size and carrying capacity made it a popular choice for Transport Companies. Many of them were captive to various companies across the state. The wagon modelled is the modified version with the uniform loading area. As freight moved towards containers, the wagons were given a new life in BHP steel traffic as HWOS wagons. Plus a number were allocated to Q-Link Traffic for cranky/ruff loading to western and north coast centres. Other were reclassed WHOI for infrastructure service.


HWOS and other HWO’s.
The wagons come in packs similar to other wagons made in China. The outer cardboard packaging leaves no doubt to what prototype is inside, a company logo similar to a 1200 DEL chevron, with blue, white and orange on the box.   Inside the pack is a plastic sleeve of fine detailing parts (Air hoses, uncoupling rods, and door stops) and a two page instruction sheet. The sheet details model features, Safety Notes, Important information regarding  delicate parts, warranty, spare parts, adjustable coupling pockets 16.5 & 12 mm track standards), fitting brake pipe hoses, uncoupling levers and door stops. I found the fine detailing parts were easy to fit, plus it allowed me to position parts how I wanted them. The model can be purchased to run on both 12 mm and 16.5 mm track systems.  

The detail on the wagons is awesome, having worked with the prototype for many years, nothing is missing. The manufactures have done there homework, plus have considered how the model will look and run on the layout and handle by the modeller. The brake gear looks that good you would think it works. The bogies have brake beams and blocks, and a SAV value (Load/empty device) on one bogie. The bogie class, manufacture and other marking are all there. The wagon end has bifurcated brake pipe hoses, one has the tap open and the other is closed, just like the real thing on a train.  Stencilling on the wagons is spot on, all correct size an information for the era.
Underfloor detail.
 

On the track straight out of the box the wagon rolls very freely, leave them on a slight grade, and they take off.  Across rail joints the wagon sounds just like the real thing. On my Peco track and points the wagons operated faultlessly and pass the requirements I use as a standard for rollingstock going on the layout for operations sessions. After this I gave them the “flick” test, most times this end up in a mess all over the layout. This time with six coupled wagons, I had to go down at the other end of the layout to find them. The bogies are strong and there is no side play in the wheelsets. In trying to derail the wagons, I pushed the six wagons on the front of a loco at speed through a double crossover. They were like glue and stuck to the track without incident.

Pushing through a double crossover (Peco Points)

Note the different shades of grey, the 1980 wagons are darker than the later 2000 era wagons.  


Fly shunting was something I enjoyed watching, after the 90’s it was outlawed by management. This move saved time, to get of the other of a wagon, if often required the shunt engine to run around via the loop, not to many short loops in most yards. Fly shunting the engine would push the wagon up the head shunt or main line. In the steam days the shunter would ride on the cow catcher. The engine would come back and the shunter would drop the coupling, the driver in hearing the coupling drop onto the cow catcher would increase speed to clear the points. Once the engine was clear of the points, the shunter at the points would reverse the points and the wagon would go running down another road until it hit another wagon or the shunters applied the handbrake. The shunt engine would come back to the points and run back onto the wagon. This is one thing I have not been able to do on the yard until today. At first I tried one HWO off the shunt straight. The trick was reversing the tortoise point motor between the two. After a bit of practice, I could fly shunt six HWO wagons from the front of the shunt engine (Paw Paw) to the back of the engine without running around.     

For the modeller who likes to add his own stamp to his rollingstock, what a canvas you have to work with, endless opportunities for loads and weathering. Wooden floor inserts and bullhead all have wood grain. That gives you both inside and out to weather. One could write a book highlighting the detailing on these wagons.


Wood grain on the timber floor inserts
If this manufacture produces anymore wagons I will need to rethink my QR modelling era/eras in much the same way I did with my NSWR rollingstock. I have had a FNH 2170 from day one, I guess it’s about time it did some real work.  


 Bogie Detail and markings 
 
Congratulation Carl, Graham and Lincoln (CGL Models) on an awesome model and for making a popular uneek prototype general freight wagon available to modellers.


Tuesday, 30 January 2018

MG Sheep Van.


Drawing 2649, (P159 dated 5/1/14) shows MG sheep vans/wagons were 20’ long by 8’ wide. They were the lowest of all the sheep wagon on the network coming in at 9’ 7⅝” high. This is much lower than most wooden box wagons, some AG covered goods wagons were 10’ 5½” high. The wagon had an average tare of 7 T 10 cwt and carried approximately 110 sheep. The wagon were similar to most other sheep wagons, covered two decks, side and end gates. The two decks are less than three feet apart. Drop down gangs on the end allowed for strings of wagons to be loaded from a single end or side loading ramp without the need of a engine to move the wagons as loaded.

 Old style ramp, most were modified in the mid 80's for the new steel wagons.
 
The wagon was fitted with Grover’s Bogies with 2’ 2” wheels, with 8” x 4” journals. Many QR wagons around the 20’ in length had Grover’s Bogies. In short they had a single axle swivel bogie at each end which was diagonal connected with rods. This allows the two wheelsets to turn into curves together reduce rail and wheel wear.   

Chivers "AG" kit with working Grover's bogies.
Statement showing rollingstock in service for the 30th of June 1960 showed 127 wagons in service.  The class remained in service until the mid 80’s. The wagons were painted Red Oxide until mid-1969, after that date they were painted QR Freight Grey. During the early to mid-70’s, wagons of both colours could be observed working on the network.    
The wagons were mainly used for single orders to convey sheep, pigs and calves to sales and small goods processing plants/abattoirs. It was common to see three or four 4 wheeled sheep wagons sitting in most stations yards on the Darling Downs. They were regular visitors to KR Darling Downs at Willowburn in Toowoomba and in Brisbane they would turn up at Cannon Hill and Doboy.
MG Charleville  
The General Appendix to the Book of Rules has a lot to say about the conveying of live stock.
Clause 477 indicates staff generally must exercise special care in the transport of live stock and do everything possible to avoid bruising. Care must be taken to avoid undue shunting. The overcrowding of calves or pigs in MG and L vans must be given attention. Large calves must not be forced into wagons in which they are unable to stand. Calves and pigs must not be loaded in the same tier of a livestock wagon unless they are effectively separated by a hurdle. When the hurdles are not provided by the consignor, the calves and pigs must be loaded in separate compartments and charged accordingly.
 
Trucks containing livestock must be tightly coupled together. Wagons containing livestock must as far as possible be marshalled towards the front of the train and not in the rear of empty and lightly loaded wagons. Wagon containing pigs attached to trains conveying passengers must be placed as far as possible from the passenger vehicles. Drivers were not over happy with pig wagons being on the engine, generally these were to be marshalled towards the centre of the train.    
Small consignments of livestock must not be accepted for places beyond the direct train service (I.e. stations west of Brisbane must not receive small consignment to station north thereof or vice Versa), without clearly intimating to the sender the delay which must take place. Consignment of livestock must also have the attention of the guard who must show on his Time and Occurrence Sheet any instance of livestock travelling badly together with cause, if this be know. All livestock wagons must be in a clean condition and all cattle wagons ashed before being loaded. Smoke-box ash, when available, must be used in preference to fire-box ash. 
A permit to travel, issued by an Inspector of stock, must be presented for each consignment of stock (except pigs), including stock in crate and consignments of a single sheep or goat conveyed in dog boxes, before such are accepted for conveyance by rail. The permit must be held by the person travelling in charge of the stock, but if there is no attendant it must be attached to the waybill, invoice or consignment note, and handed over to the consignee at destination.   
Sheep Train at Wood Hill
Sheep vans gates were sealed in a similar fashion to box wagon doors. Lad Porters were given the job of seal all eight doors on each sheep wagon. Unlike box wagons, the old seal could be left in place. This task often took place during the shunt move to place the wagons on the train, it was an awesome ride with one foot on the end of each wagon with the wagons bunching up and then running out. The main role of the seal was to keep the door pin in place. However, if the seal was missing on arrival at the destination, there was a good chance the door had been open in transit and gave cause to check the wagon contents. Each seal press stamped a number on the seal. The General Appendix showed the allocated number for each location, should one go missing the replacement press would be shown in the Weekly Notice.  Larger stations had more than one press, i.e. Toowoomba station # 409, Toowoomba Goods Shed # 165 and # 257, Toowoomba (Downs Co-op Dairy Coy) # 3. The Ambulance Officer had # 1 and # A0 for sealing First-Aid boxes. 
Press 9F (Location not shown in General Appendix. ??
 
Lad Porter "Westgate" sealing the wagon.
 
 
Scale of Rates for livestock. “MG” vans shall be charged at “L” van rates plus 50 per cent. Half an “L” of sheep or pigs shall be charged two-thirds the rate for a full “L” van, provided only one tier of the van is used. But the charge shall not be less than the minimum charge for a full “L” van for 32.19 kilometres. Rockhampton to Cannon Hill is 664.92 kilometres, In 1973 that cost $ 68.40 for a “L” van of sheep and $ 67.45 for pigs.  I will let you can do the sums for one tier (½) a “MG” wagon of sheep. You can see why I didn’t work to many livestock stations.
Having grown up as a kid in Western Queensland where most stations had sheep/cattle trucking yards, it was a given for Westgate to have one. Most western locations had separate sheep and cattle yards, with most sheep yards having an end loading banks. Due to the limited area available on the layout a combined yard (sheep/cattle) was selected. Most combined yards had side loading for both cattle and sheep. I really wanted an end loading bank for the sheep yard. In the late 60’s I recalled a new set of private yards being built at Sommariva, about 30 miles east of Charleville.

 Combined Loading Ramp at Goondiwindi
 
Side loading Ramp Ulimaroa (Miles - Roma).
End loading Ramp Sommariva  (Morven - Charleville)
These yards were unusual in that they were a combined sheep and cattle yards with a end sheep loading ramp. I also had a set of photos for the yards taken in the early 70’s. On deciding to build the yards for the layout I started looking for some measurements, so next time I visited home I would stop and get a few more photos and run a tape over various areas. You guessed it, it had been knocked over, even the siding was gone. A few mates were able to dip up some plans of both sheep and cattle yards. The next trick was making them fit into the area I had allocated for the yards. Both sheep and cattle loading ramp was much longer than I expected.  With a pencil, some graph paper and a scale ruler a revised ramps were drawn up that looked right, selective reduction is the name given to the process. The ramps were reduced by about a half, the size of the holding yards were also reduced to fit the allocated space.


Sommariva Yards.  
Now in having sheep and cattle yards, wagons are required to provide operations on my railway. Over the years various cattle wagons have been available, the current cattle wagons on the layout are some of the first produced going back to the 70’s. For time being they are OK for now. The plan is to replace them one day. Very little has been available for sheep wagons resulting in various thinking sessions looking over plans and photos searching for a simple method to make them. Sorry to report nothing has come up to dated. Maybe a brass etch for the bars could be the go ???.
Charleville Mid 80's.
MG Kit.    The kit was first made available by Three Foot Six Models for a limited period in the mid 1990’s.  About three years ago the kit was added to the Caintode Flats Model range. The kit contains brass etches, white metal lost wax and resin components. The main body etch is made from 2 layers to achieve the correct profile. To assemble the kit the manufacturer suggests good soldering skills are essential. I put off purchasing the kit and was waiting for someone to do their first. One was available at the May Show last year so I took the punt.  Over Christmas I plucked the courage to have a go.  
A good soldering iron is required, instructions suggest a temperature controlled iron of at least 50 watts with a 3 mm tip. A good supply of drills is required, the following sizes are needed .3mm, .35mm, .4mm, .5mm, 2mm and 2.5 mm. Getting small drills is not easy, so I asked Gary where to get them. He suggested McJing Tools at Yagoona in Sydney. mcjing.com.au They have the small drills in packs of 10 for $ 10.00. Postage was $ 10.00. A phone call with credit card details had the drills in my hands within 24 hours. All up you drill out about 200 .3mm holes in the etch parts. I did break a few drills, overall not as many I was expecting, just take it slow. The instructions for assembling and fitting the sliding gates suggest you take your patience tablets as his where the fun starts.  
The kit starts by assembling the underframe / lower floor. You have a choice of fixed or compensating bogies, I made mine compensating, one end is fixed and the other end rocks.
During construction, some small parts did join the frequent flyers club, thus some changes were made with substitute parts. The wagon was completed with all side gates working. I didn’t think to much about this during painting, you guest it, I paid the price and they don’t open anymore. With the end gates I made one end top gates open with the gang down for the loading ramp. At times they did run in service with open gates and walkway down. The gangs on the other end still work after painting. Just take your time and test fit parts before soldering. I did fit the underframe etch the wrong way around, closing off the brake cylinder mounting hole. That’s just me, if there a choice of two ways in doing things, I always manage to do it the wrong way.   
The only sheep I had was Kerroby Models, I purchased them unpainted in a bulk pack, painted ones are available. These are white metal, thus have little weigh to them. Sheep was only add to he outer sides to give a full load look. They were a little high and needed to be kneecapped a little. The Signals Branch Shapeways shop have 3D sheep which could be a better choice. All up the wagon comes in at 70 g, which is about NMRA standard for a H0 model of that size. To date the wagon has been marshalled on the lead of all trains and has run and pushed back without any issues. 
The completed wagon was first painted with a etch primer. Dulux Metalshield etch primer (grey) available from Bunnings was used. The paint from a rattle can was decanted into a plastic cup and applied to the model with an airbrush for more control. The finish colour was PGC Oxide lacquer. Underframe and buffer heads were picked out in black by hand.


Over all I'm very happy with the end result, but I let you be the judge.